I bet everyone during the pandemic felt far away from everyone, not connected to anyone, not social. Especially because we didn’t know, and with all new variants coming up, we still don’t know how dangerous this COVID illness can be. To make it a little easier, I organized online Craft Get-Togethers in the winter time and outdoor ones in the summer. I’m going to give you a good amount of craft ideas for your adult craft party!
Crafty Dutch Girl is reader-supported. When you buy through links on our site, we may earn an affiliate commission. Learn more.
Online Zoom Craft Party
Compared to an outdoor or indoor Craft Party, an online Craft Party is not as easy. From gathering items to make the craft, till the camera set up. Most of all, it kept us going and get connected again. Everyone had their cup of coffee or tea and we talked while crafting and….we didn’t have to go anywhere. Just find a somewhat quiet place and that’s often hard with small children.
Crafts for an Online Zoom Craft Party
Its easier of course, if everyone has the materials you need for the craft. I just asked in the invitation if everyone has ”the following items”. Then I gave them a list. As crazy as I am, I brought a little paper bag with the needed materials and dropped it off at their house. Some people felt unsafe going to a store at that time and I had most of the things at home. Yes, I’m a craft material hoarder:).
A better way is to get the basics at the beginning of the Craft Parties, maybe in a little caddy (or a fancier one) so they always have everything ready. Then find crafts that could be found at home. Here is a list with basic materials for a Craft Party:
- Glue
- Paint brushes
- glue gun with sticks
- mod podge
- Glue stick
- acrylic paint
- mix bowl
- Masking tape
- scissors
- embroidery needles
Most of these materials I stock up during our school supply run in the beginning of the school year.
Here are a few ideas:
1. Easy no-sew Gnomes
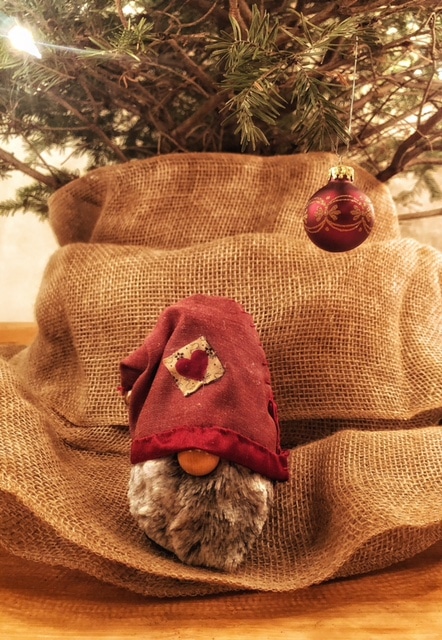
Gnomes are so popular right now, and they are so cute! For my Kids Zoom Craft Party, we made snowman out of socks.
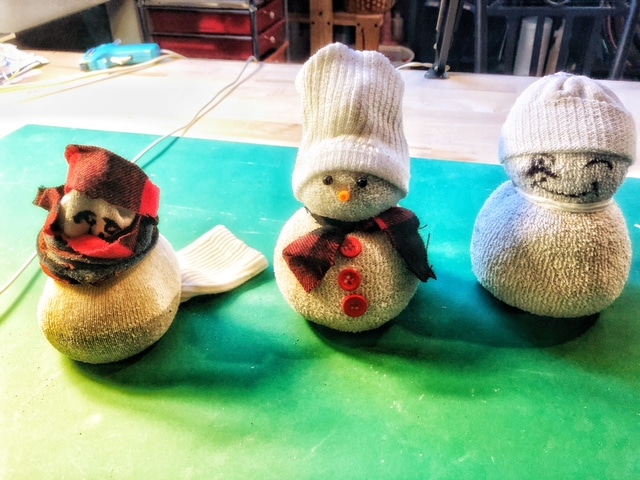
Either one you can make for the adult Party of course. Most of my party goers liked the gnomes better:)
Materials needed:
- Sock
- string (for the snowman to tie off the head)
- rice
- spoon
- fabric or felt
- wooden bead
- bell or pompom
- fuzzy fabric or yarn for beard (plus brush)
- hot glue
Open up the sock and fill it up with spoon fulls of rice. Be sure to pat down the sock as you fill it up, because the sock will expand. Tie a knot on top and fold the rest of the sock over the rice filled part of the sock. The ends are on the bottom of the gnome.
Cut a triangle from the fuzzy fabric and glue it on the gnomes bottom part of his face. If you’re using string: Wrap string around a piece of cardboard (about 10 inches long). Cut the string on both sides where the string goes around the cardboard. Now you’ll have pieces of strings of about 10 inches long. Tie all these pieces together in the middle and brush the strings out with preferably a pet brush. Glue the beard in the lower part of the face.
Use a big bead for the nose. Make a hat out of felt or fabric (cut a wider triangle). Either glue or hand sew the hat together and attach a bell or pompom at the end.
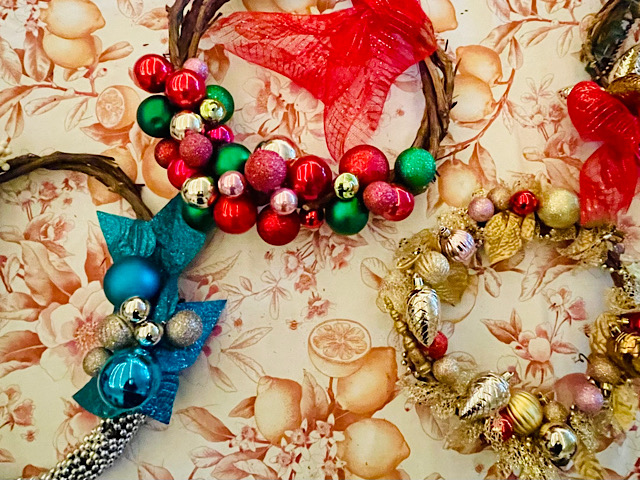
2. Metal Cloth hanger Wreath
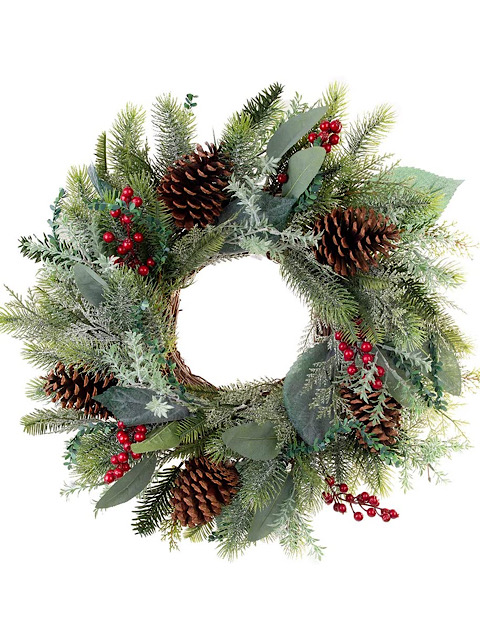
We made Christmas wreaths with our Pinteresting group (which moved from online to outdoor to indoor Pinteresting Group). Someone donated a ton of bare wreaths, Christmas ornaments, fake flowers and leaves, so we took advantage of using them and making these beautiful wreaths. For an online party, it’ll be harder to have these materials on hand. Therefor a metal wire clothes hanger you might have at home, could work perfectly for the base of a wreath.
Materials you need:
- Metal wire hanger
- newspaper or plastic bags
- twine or string
- greens or any decorations you’d like to use
Here is a video about how to make a beautiful wreath with a wire hanger. The newspaper and plastic bags are not only to make it good base to add the greenery and ornaments, but also to keep the wreath last longer, especially if you want to keep it outside.
Here are more ideas for 4 season wreaths.
3. Tin can wall hangers
This is a very cute idea if you have left over cans. The best are the shallow cans (tuna or pet food).
Materials you need:
- Paint brush
- acrylic paint
- table cover (plastic sheet)
- hammer and a nail or a drill
- napkins or magazine clippings
- scissors
- mod podge
- twine or string
Here is a video, so you can see how to make it.
4. Tin Can Pen Holders
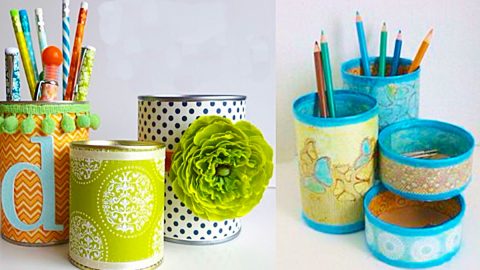
If you not only have small tin cans (used for the craft #4), but bigger cans, this is another craft for you.
Make a set for organizing your desk. A nice place for your markers, pens, brushes etc.
Materials you need:
- Cans
- paint and brushes
- mod podge
- hot glue
- twin or yarn
- scissors
- magazines, newspaper
- ribbons
- Any other decorations like sequins
You can go all out on this one. I just love fun crafts that can be useful too.
You can paint the cans first or wrap them with yarn or twine. Then decorate them anyway you like.
5. Journal Cover with Magazines
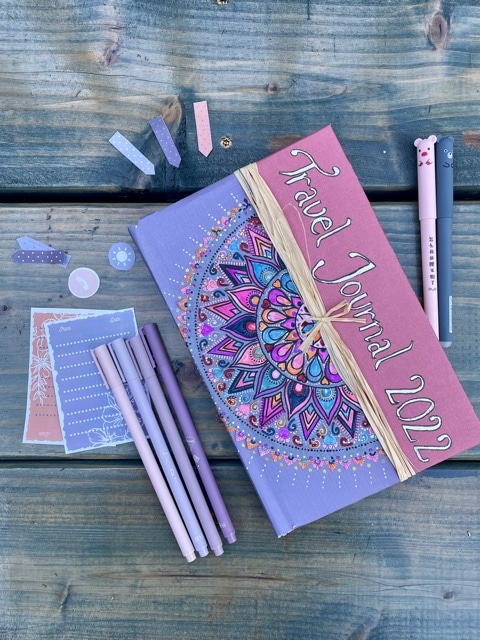
I personally love journals. And to make them personal for you from you, here are some ideas how to make the cover for your journal (travel/art/to-do/agenda) extra special.
Here is a simple cover for any journal
Here is a travel journal cover
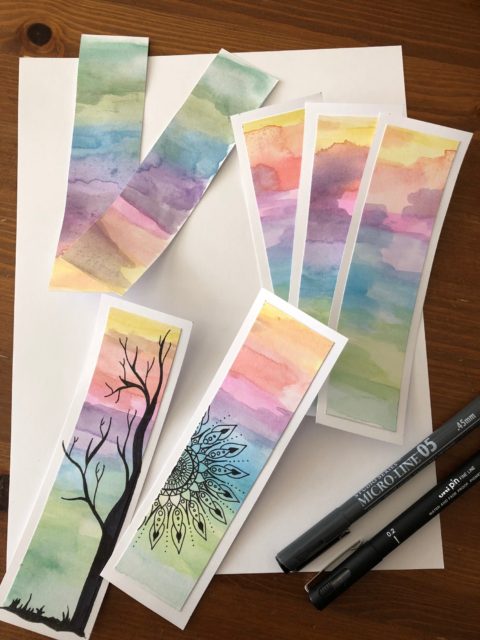
6. Bookmarks
In case you need more ideas. Here is a website from a mom blogger who has tons of ideas with recyclable materials or things you can find at home.
Here is a fun video for an easy book mark.
And here are some bookmarks I made a few years ago
You can use card stock or cardboard. Any kind of scrapbook paper or aged book pages, watercolors, black markers, ribbons or twine.
Crafts for Indoor or outdoor your adult Craft Party
It shouldn’t be that much of a difference if you have your party at an indoor (maybe a local coffee shop, or public area) or outdoor place (park or back yard). Of course outdoor you can do more messy crafts and you have more room to spread out. Indoor can be cozier and you have to be careful NOT making a mess. Be respectful to your local indoor facilities and be sure your party buys some of their products as a compensation of using their place.
1. Printed Canvas Totes
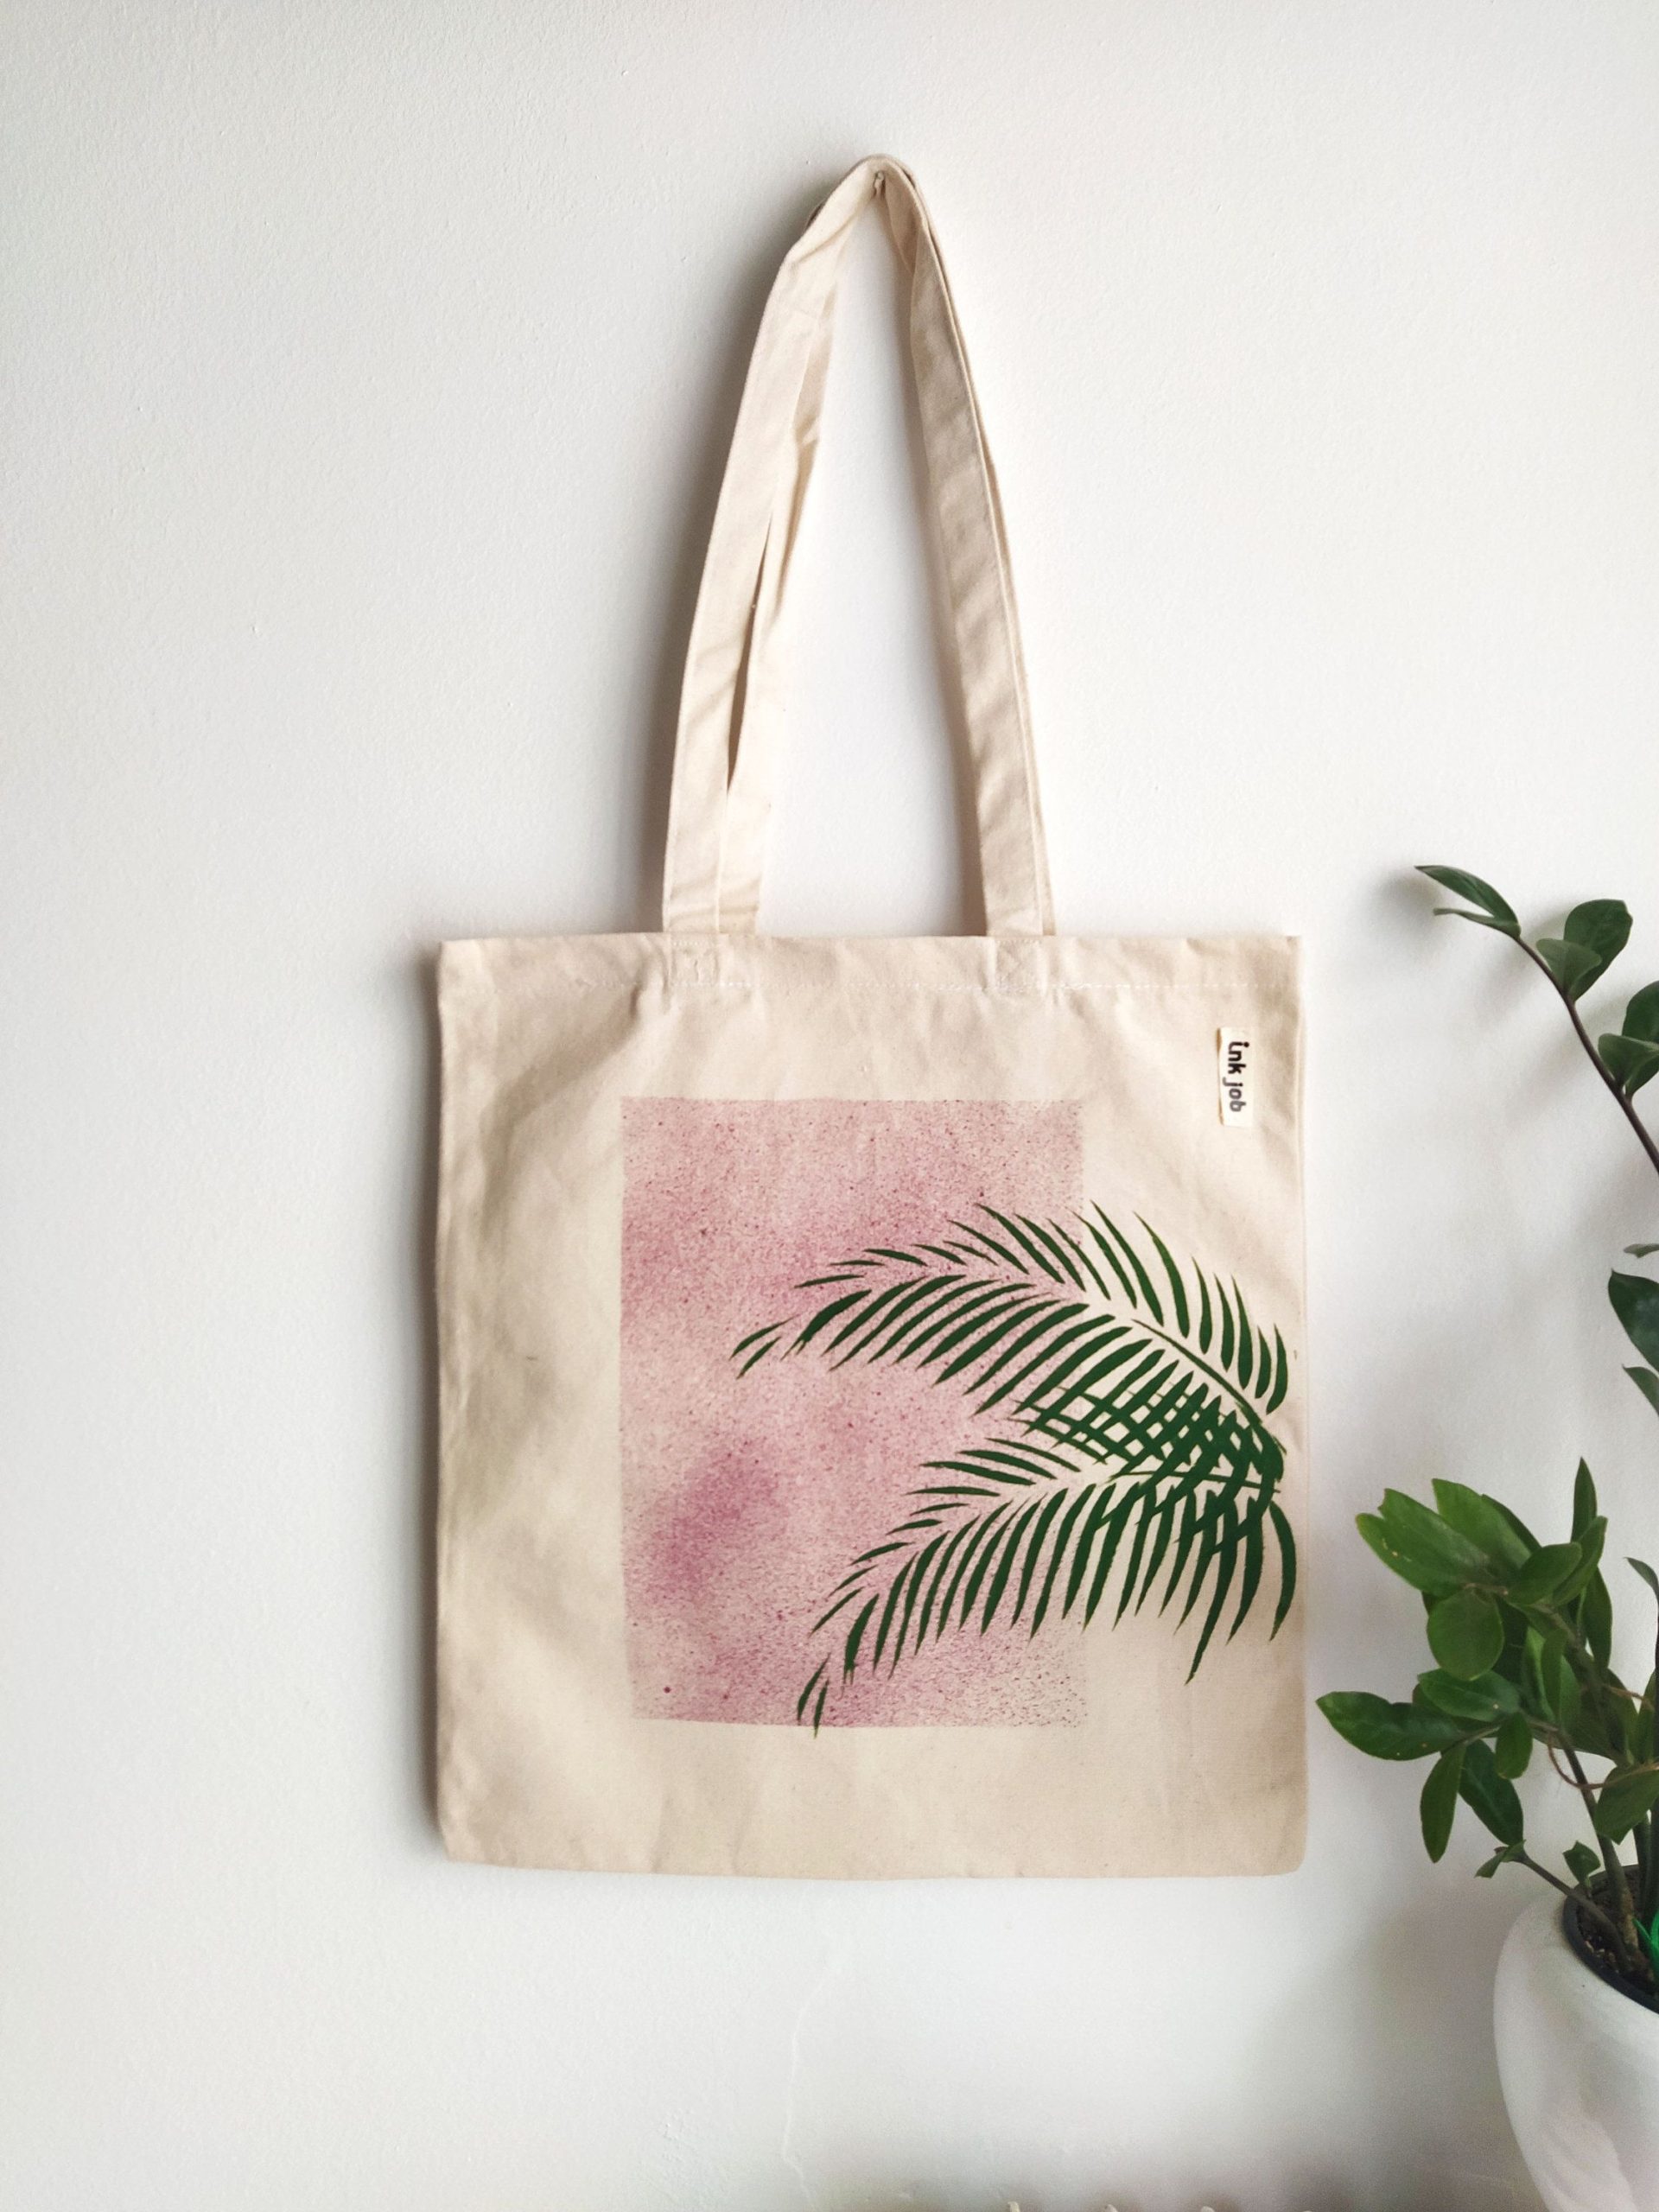
This is a good outdoor project. Make sure you put some cardboard inside the bag. You can use different kinds of techniques for this project.
- Use leaves or other objects to print. Use fabric paint to carefully brush or roll on the leaf or object. Then firmly press on the canvas bag.
- Use leaves, flowers or other objects to lay on top of the bag. Then use a big paint brush or tooth brush (for finer splatters) and fabric paint to splat paint over the objects. Take the objects carefully off the bag and let dry.
- Use painters tape to make shapes on the bag. Use foam brushes or rollers to put paint on the bag. Carefully take off the tape and let dry.
- Make polka dots with round foam brushes.
2. Decoupage Candles
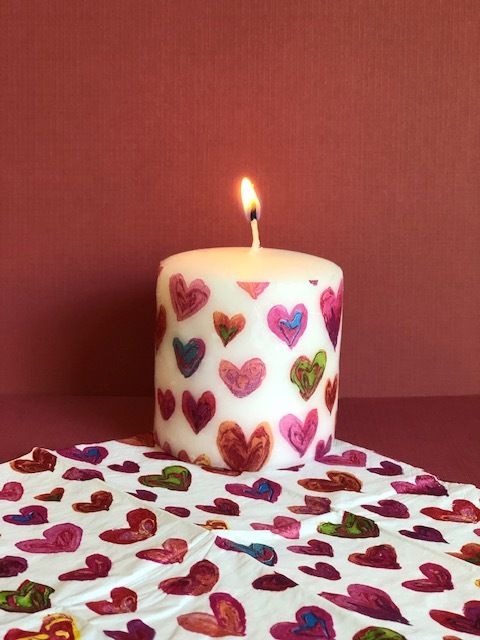
This was a fun one, especially around Thanksgiving or the winter months in general. I gave several people these kind of candles as gifts. They are really fun to make.
3. Exploding Photo Album Box
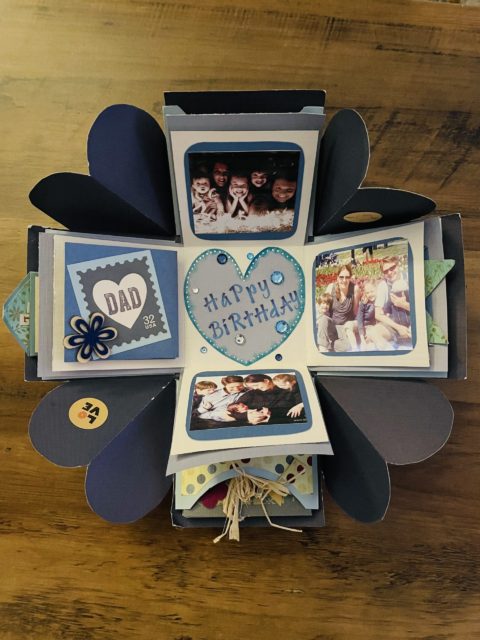
This looks a little intimidating, but we only made the bottom layer (the box) and the lid. If your friends choose to add layers and decorations, like pictures, they could add those later also. The fun thing was, they created something easy and fun. Something that can ”explode”!
4. Pumpkin decorating
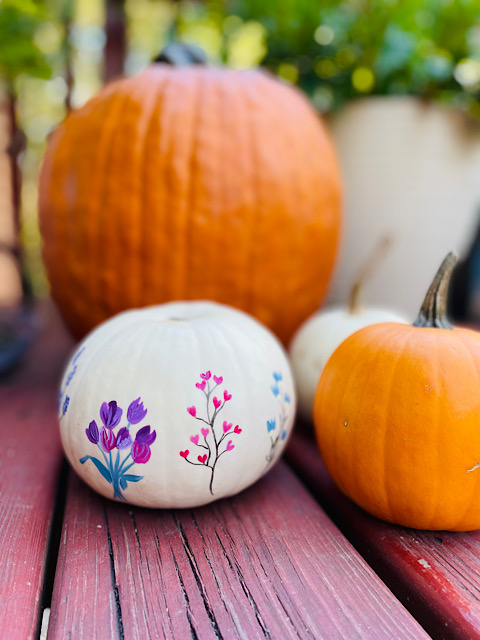
This is a great one for outside right before Halloween. There are different ways how to decorate them and they’re fun too.
- Just some paint and a brush
- Yarn and glue. Twist yarn around pumpkins in different colors.
- Hot glue some crayons on top of the pumpkins and use a hair dryer to melt the crayons so the colors drip down the pumpkin.

5. Valentine’s Day on Nails and Strings heart
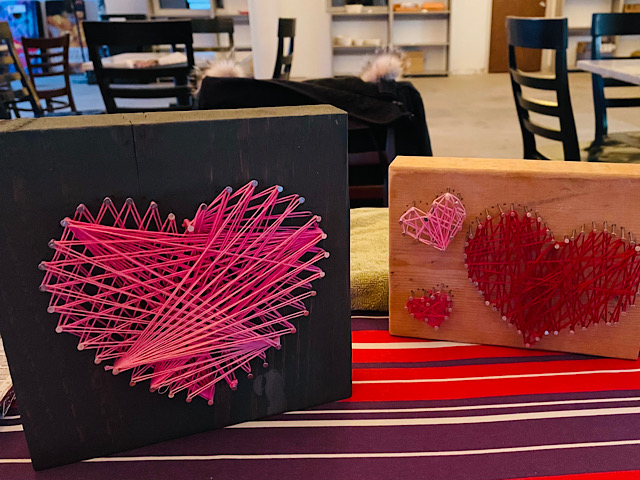
Right before Valentine’s Day we made these fun string hearts. You’ll need a piece of wood, preferably 1 inch thick at least. Nails and a hammer. For the heart template you can fold a piece of paper in half and draw half of the heart on one side of the paper. Cut out, fold open en you’ll have a perfect heart shape. Tape this shape on the wood and start hammering the nails, same distance, apart from each other.
Then use embroidery yarn to either criss cross around the nails or regular threading over every single nail. Make a knot and cut off excess thread.
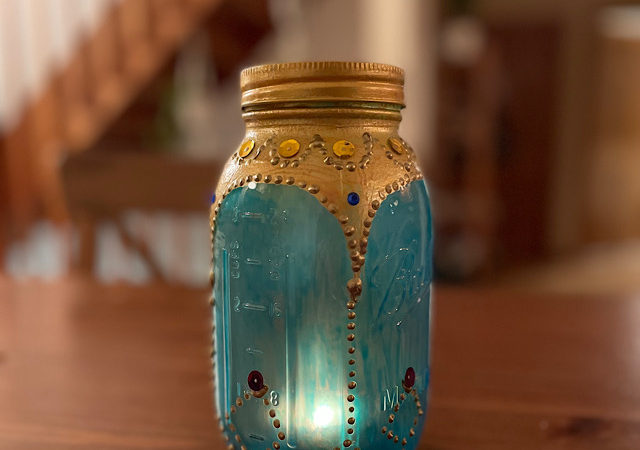
6. BoHo inspired lantern
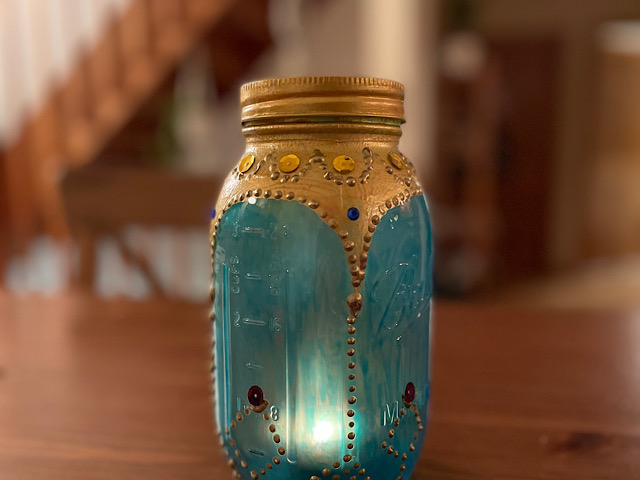
For your Boho inspired home decoration, you can add these beautiful lanterns in many colors. We used blue-green, pink, golden and orange.
These are the materials you’ll need:
- Mason jars, either seize is fine.
- mod podge or glue
- brushes (soft)
- food coloring
- mixing bowl
- metallic acrylic paint
- puffy paint
- sequins
- tea light
Use clean jars. Get rid of the inside of the lid part. Mix a drop of food coloring of choice with a dollop of glue or mod podge. Paint the inside of the jar with the mixture. Don’t worry so much about the brush streaks. This will mostly go away after the mixture dries.
Paint the rim of the lid and parts of the outside of the jar with any metallic paint of your choice. Maybe you need a second layer.
Add dots of puffy paint on the jar. The trick is to use the same amount of pressure, to make equal dots and place the the same distance. My problem was figuring out the middle of each side of the jar. Now I know what to look for when I make more of these!
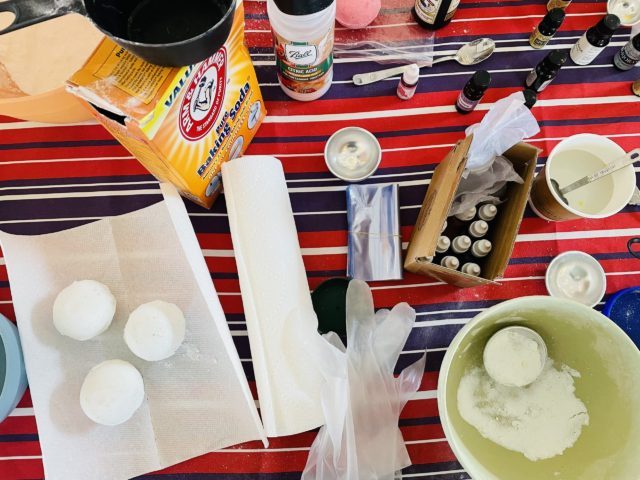
7. Bath Bombs
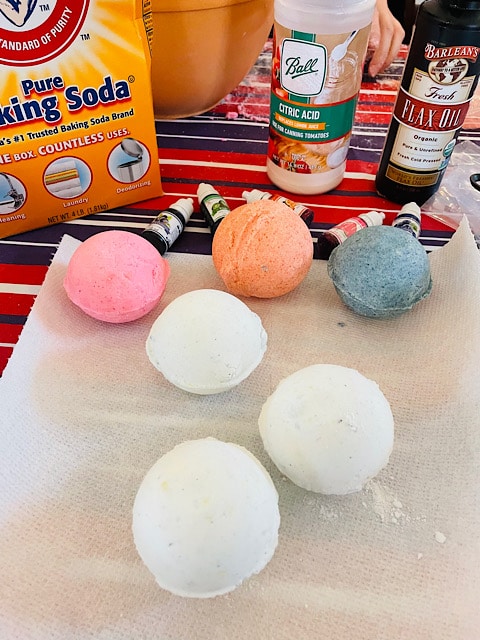
My friend has a good nose for essential oils. I asked her to find some great oils for our next craft.
I got some ingredients and measured them in a bowl. Use a spoon and wear gloves. Food coloring can get messy. I got different shapes of bath bomb molds in a kit. Here are the rest of the ingredients:
- Baking soda (1 cup)
- citric acid (1/2 cup)
- cornstarch (1/3 cup)
- molds
- essential oils
- Soap coloring (these came with the bath bomb kit)
- hemp seed oil (optional)
- lavender or rosemary (optional)
We added the ingredients in a bowl and mixed them with our gloved hands or spoons. Push the mixture firmly in the mold halves and add some more mixture on top. Firmly press the mold halves together.
Now you have a bath bomb. Luckily our kit came with shrink wrap bags, so we put our bath bombs in the individual bags.
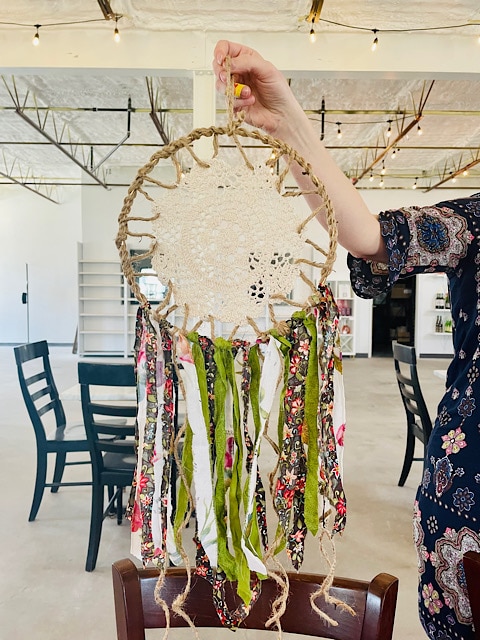
8. Boho inspired Dream Catchers
These were a big hit! Also because the inside was already done (AND we supported artists who made these beautiful doilies).
It was more about which colors to pick and with what do I wrap my hoop. This part is necessary, because the hoop will be too slippery otherwise.
Materials:
- Metal hoops
- twine
- doilies
- colorful fabric strips
- hot glue
- needle and thread
- optional feathers, beads.
- Wrap twine or fabric strips around the hoop. Attach it here and there with hot glue. It’s okay if the beginning and end knot is showing. Just turn the hoop so, that the knots will be on the bottom where the strips of fabric are going to be (step 3).
- Choose a doily and attach it with a needle and threat onto the hoop. Keep the doily in the middle.
- Cut or rip strips of fabric in the colors of choice. Knot them on the bottom of the hoop. Cut in an angle if you like.
- Add twine or yarn with feathers and beads.
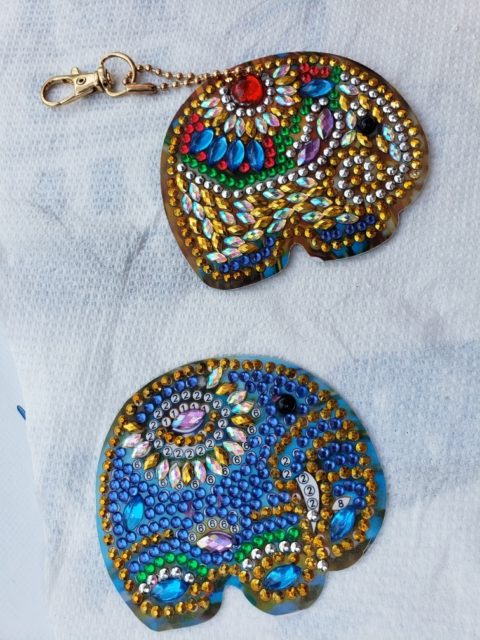
9. Diamond painting key chains
At a Craft Fair during the Pella Tulip festival in the first weekend of May, I stumbled upon a booth with diamond painting materials. I saw big canvasses and personalized pictures from people made into diamond painting treasures. In a basket I found these cute key chains with elephants and I immediately thought of our Pinteresting Group.
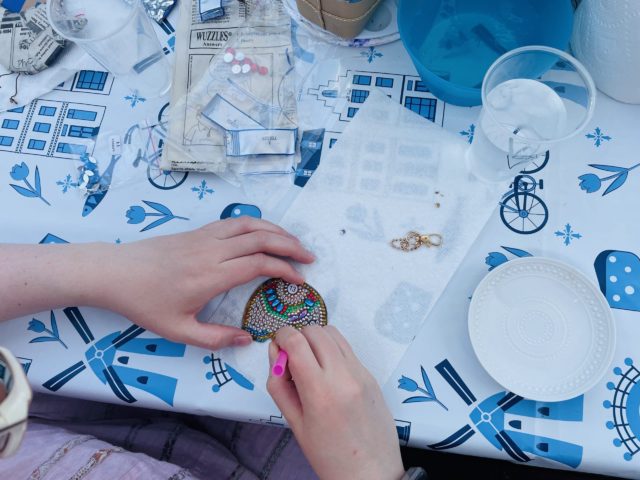
I was (pleasantly) surprised that no one in the group had ever done diamond painting. SO it was a new experience, and hopefully an addicting one for everyone. Luckily I had just enough elephants to share:)
The kit had 6 elephants with a plastic cover, a diamond painting pen (I got more from other projects), beads (diamonds), a piece of wax and a little dish. I got more dishes in the house and divided all the beads with the number written on a piece of paper in the dish. This was a great way to share the diamonds. I had more pens and wax from other projects, so it worked out great!
The kids got involved too, so I decided to buy mor of these kits.
These are really sweet and simple to do, even with kids, maybe during the summer vacation.
I have found some for you to choose from:
This was so much fun!
10. Mini Macrame Wall Hangers
This craft was one of those “let’s learn something new today”-kind of craft. Most of the ladies always wanted to learn how to macrame.
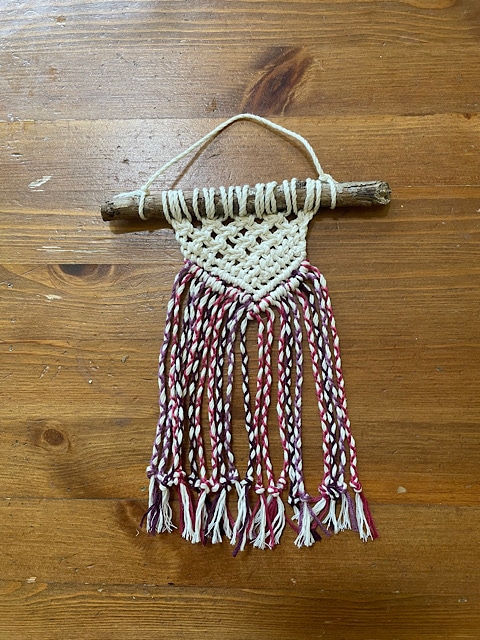
This craft looks easier than you think. Even though if you know the macrame knots, you still need to know how to make them even. In other words, how tight or loose you make the knots. As you can see in my picture, the knots were a bit too tight. Other friends made them very loose, which created a total different look. The trick here is, how to make the knots all evenly tight or loose….and that was not easy.
We started off with a wooden cutting board and a push pin. I put the push pin on top of the board to keep the project in place.
I gathered some 7 inch wooden sticks from our garden and measured 10 Macrame Cords for the project itself and 1 small one for the top to hang the project on the wall. (Strong Macrame cord also used for plant hangers or more fluffy macrame cord)
Then I showed my friends the basic macrame knot and this YouTube video. It was easy to follow and it shows how to add the strings to the stick and make the knots.
11. Plastic Spoon Luminary
It was getting hot outside and we moved indoors for this craft. Outside would’ve been better…..for 2 reasons.
- For this craft you need a bunch of plastic spoons. A great upcycling project! I had some left from my Craft Cafe. You need to cut off or snap the spoon part of the grip. Please wear safety glasses, because little bits of plastic were flying everywhere. Always snap or cut away from you!
- It was okay for this craft to use acrylic paint and a brush, but for a more smooth surface and something that sticks better to the plastic spoon surface, is spray paint the spoons. And this needs to be done outside.
This craft was a lot of fun and everyone could make it as colorful as they wanted. Plain white or all the colors of the rainbow.
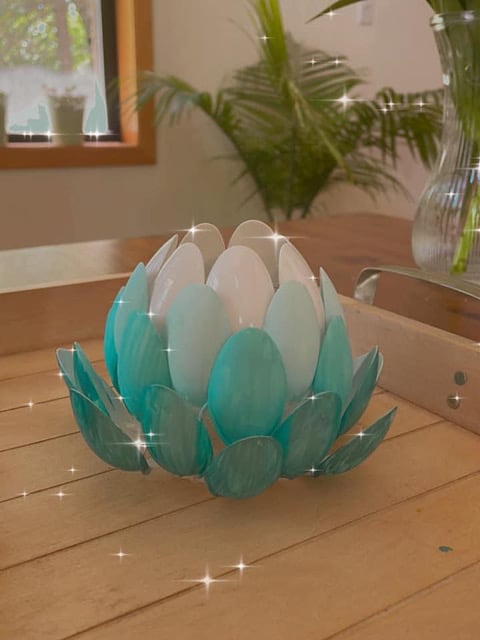
First thing you want to do is breaking or cutting the spoons. You can also paint the spoons first, so you have something to hold on to. I left 6 spoons white and painted the rest a shade darker teal to make an ombre effect.
After drying, hot glue the spoons from top to bottom on a small (Oui yogurt) glass.
How cute these luminaries look!!!!
12. Macrame Plant hanger
I know! Another macrame project? I asked on my Pinteresting Craft Group on Facebook, what everyone would like to do. My friends seem to really like macrame after I showed them 3 projects.
I like this one, because either my friends have kids or pets and this project is not only cute, but functional and a problem solving project. The pots with plants can be hung in these beautiful hangers OFF the ground, so no kids or pets can reach them!
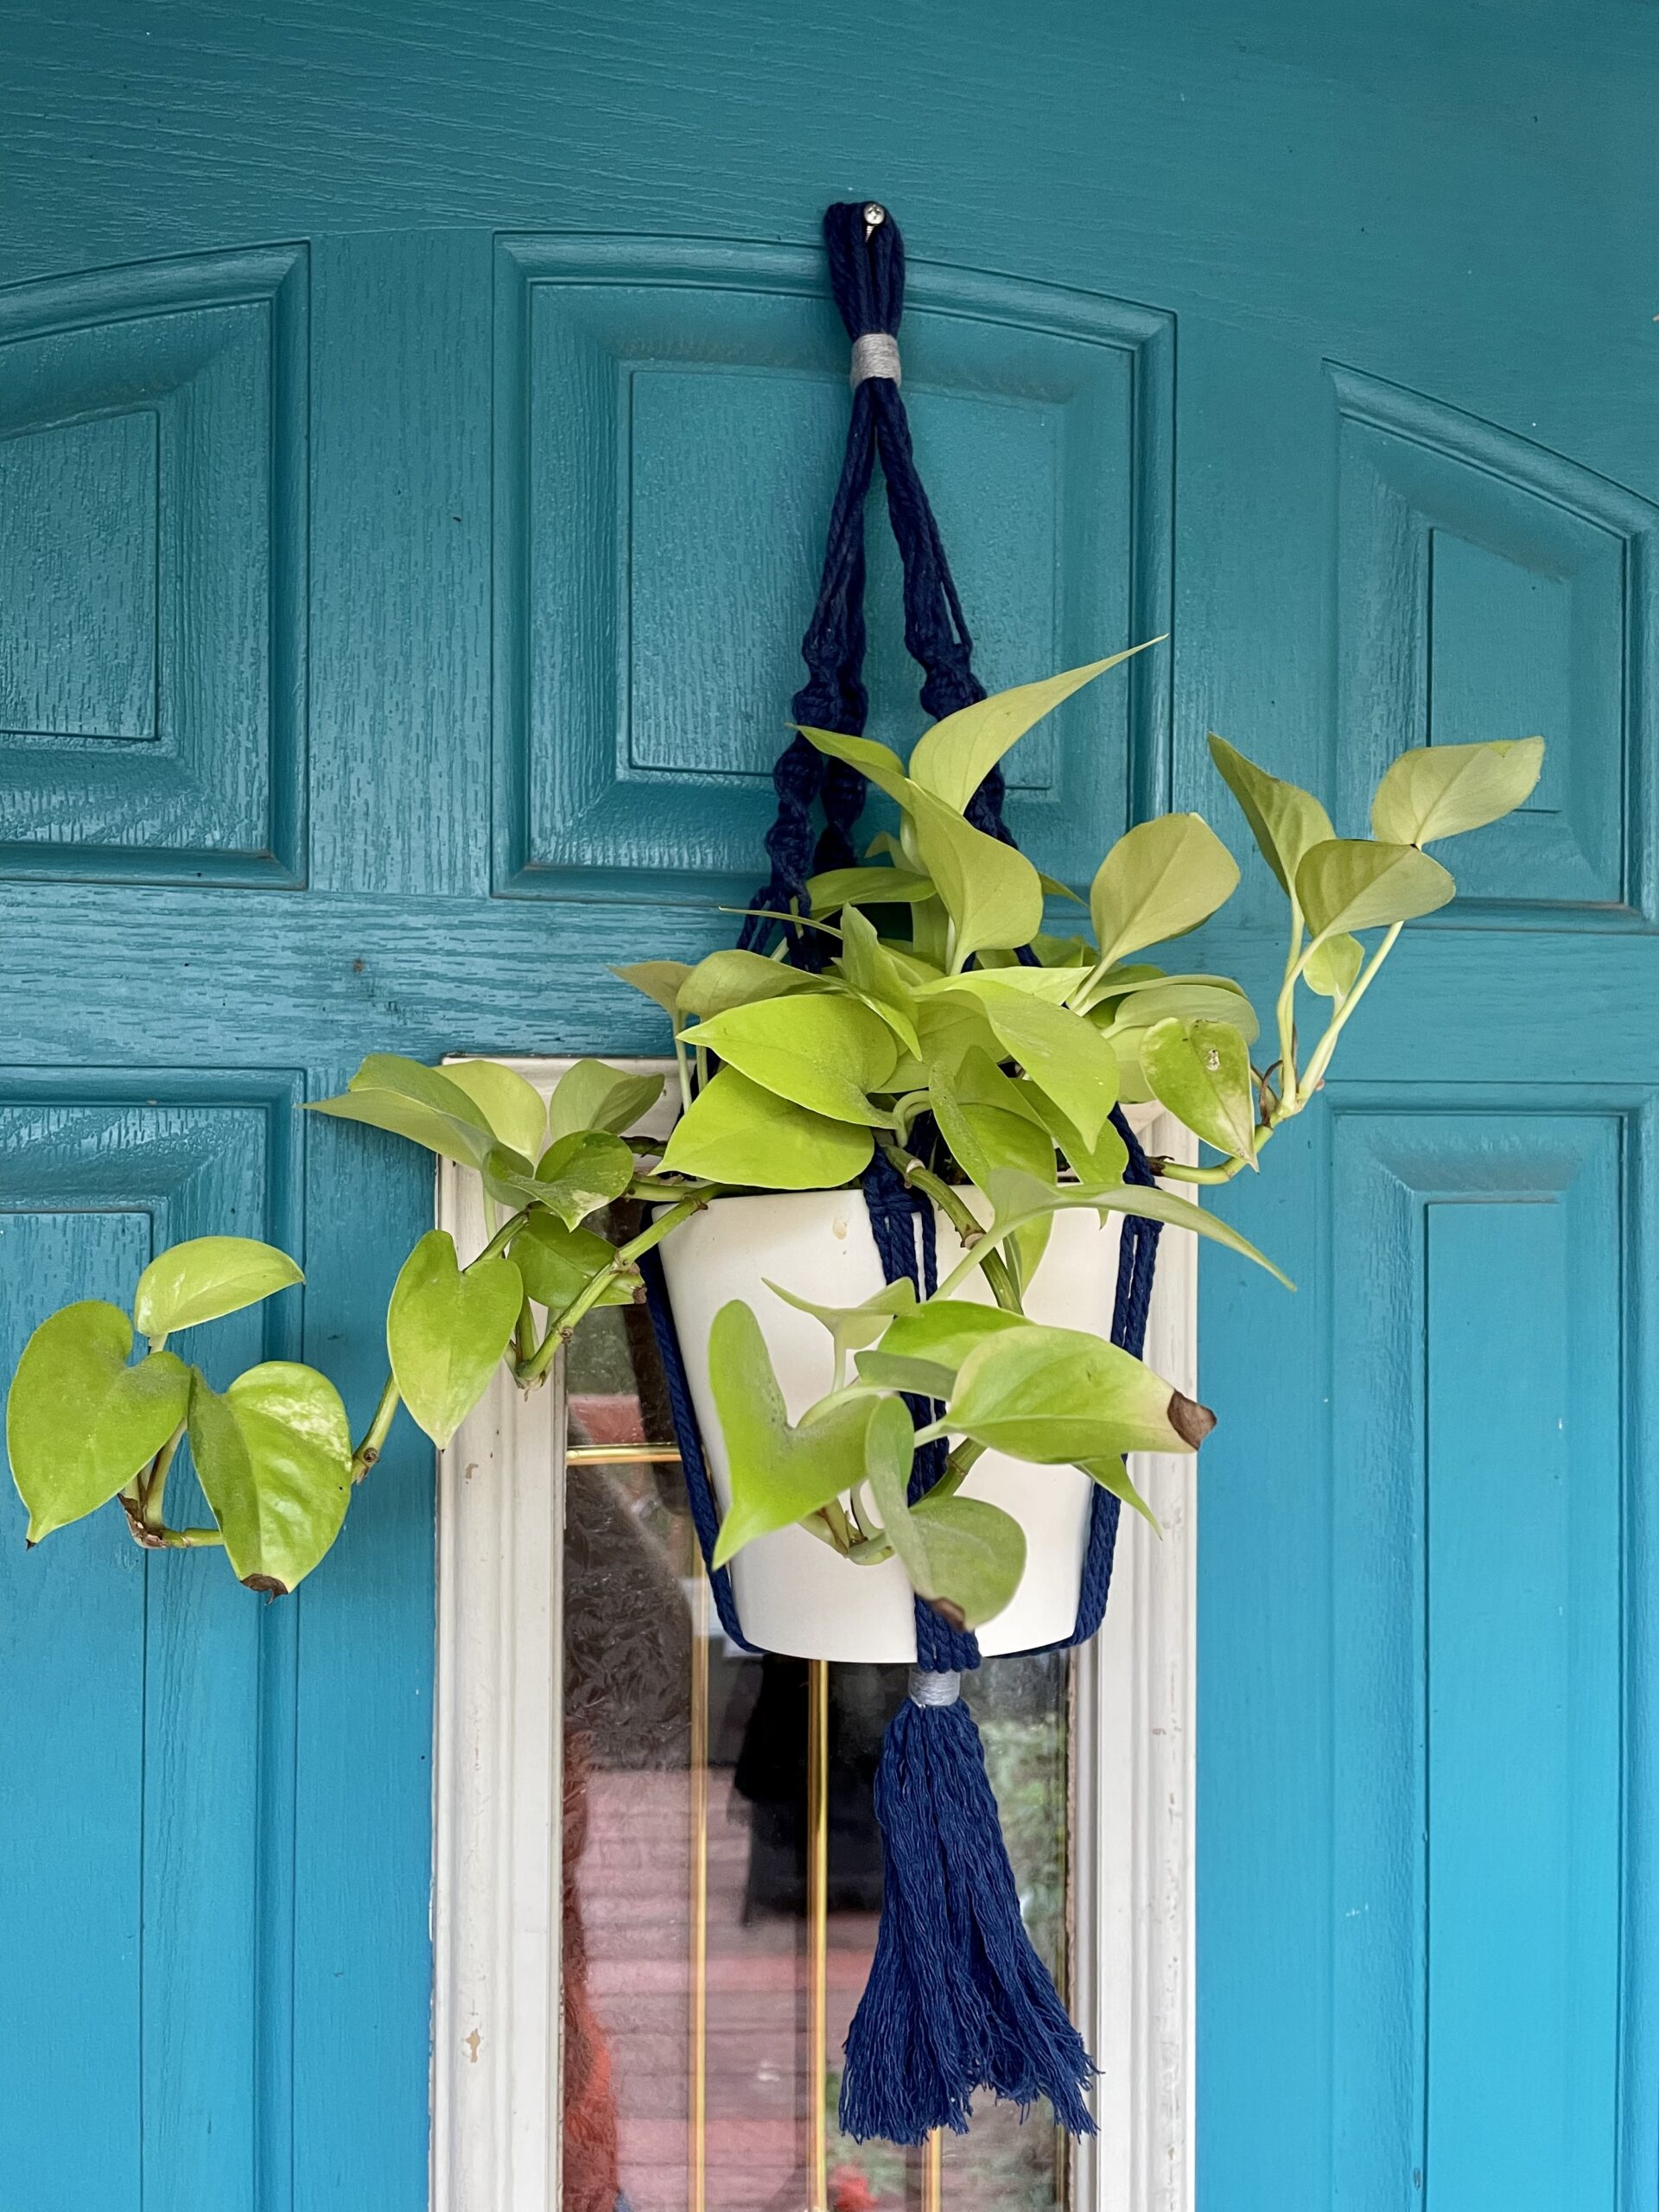
Materials:
Macrame cord (I bought several colors including creamy white, just for fun!)
Embroidery thread (optional)
Scissors
Comb (optional)
First we cut 8 pieces of string at least 6 feet each. Then we folded them in half and made a knot OR wrapped some embroidery yarn to make a loop. This loop you can use to hang your flower pot on a hook.
I showed everyone how to make a flat knot and the knot that makes the yarn swirly. Of course, most of my friends loved the swirly one and used it to make the first part of the macrame hanger. Divide the 16 strands in 4 groups of 4 strings. Eyeball or measure where you start your first knot. Make 20 knots (either flat or swirly) in the first group with 4 strands. Do the same with the other 3 groups.
Next step is to make a flat knot with 2 strands of one group and 2 strands of the next group. The last 2 strands will be knotted with the first 2 strands of the next group, etc! The last 2 strands will be knotted with the first 2 strands of the first group.
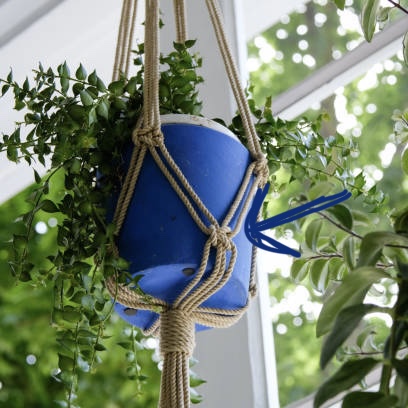
Leave about 6 inch to make the knot on the bottom (or tie all the strands together with embroidery thread. Cut the ends off as even as possible and brush with a comb to make a fluffy tail (optional).
13. Mandala on canvas
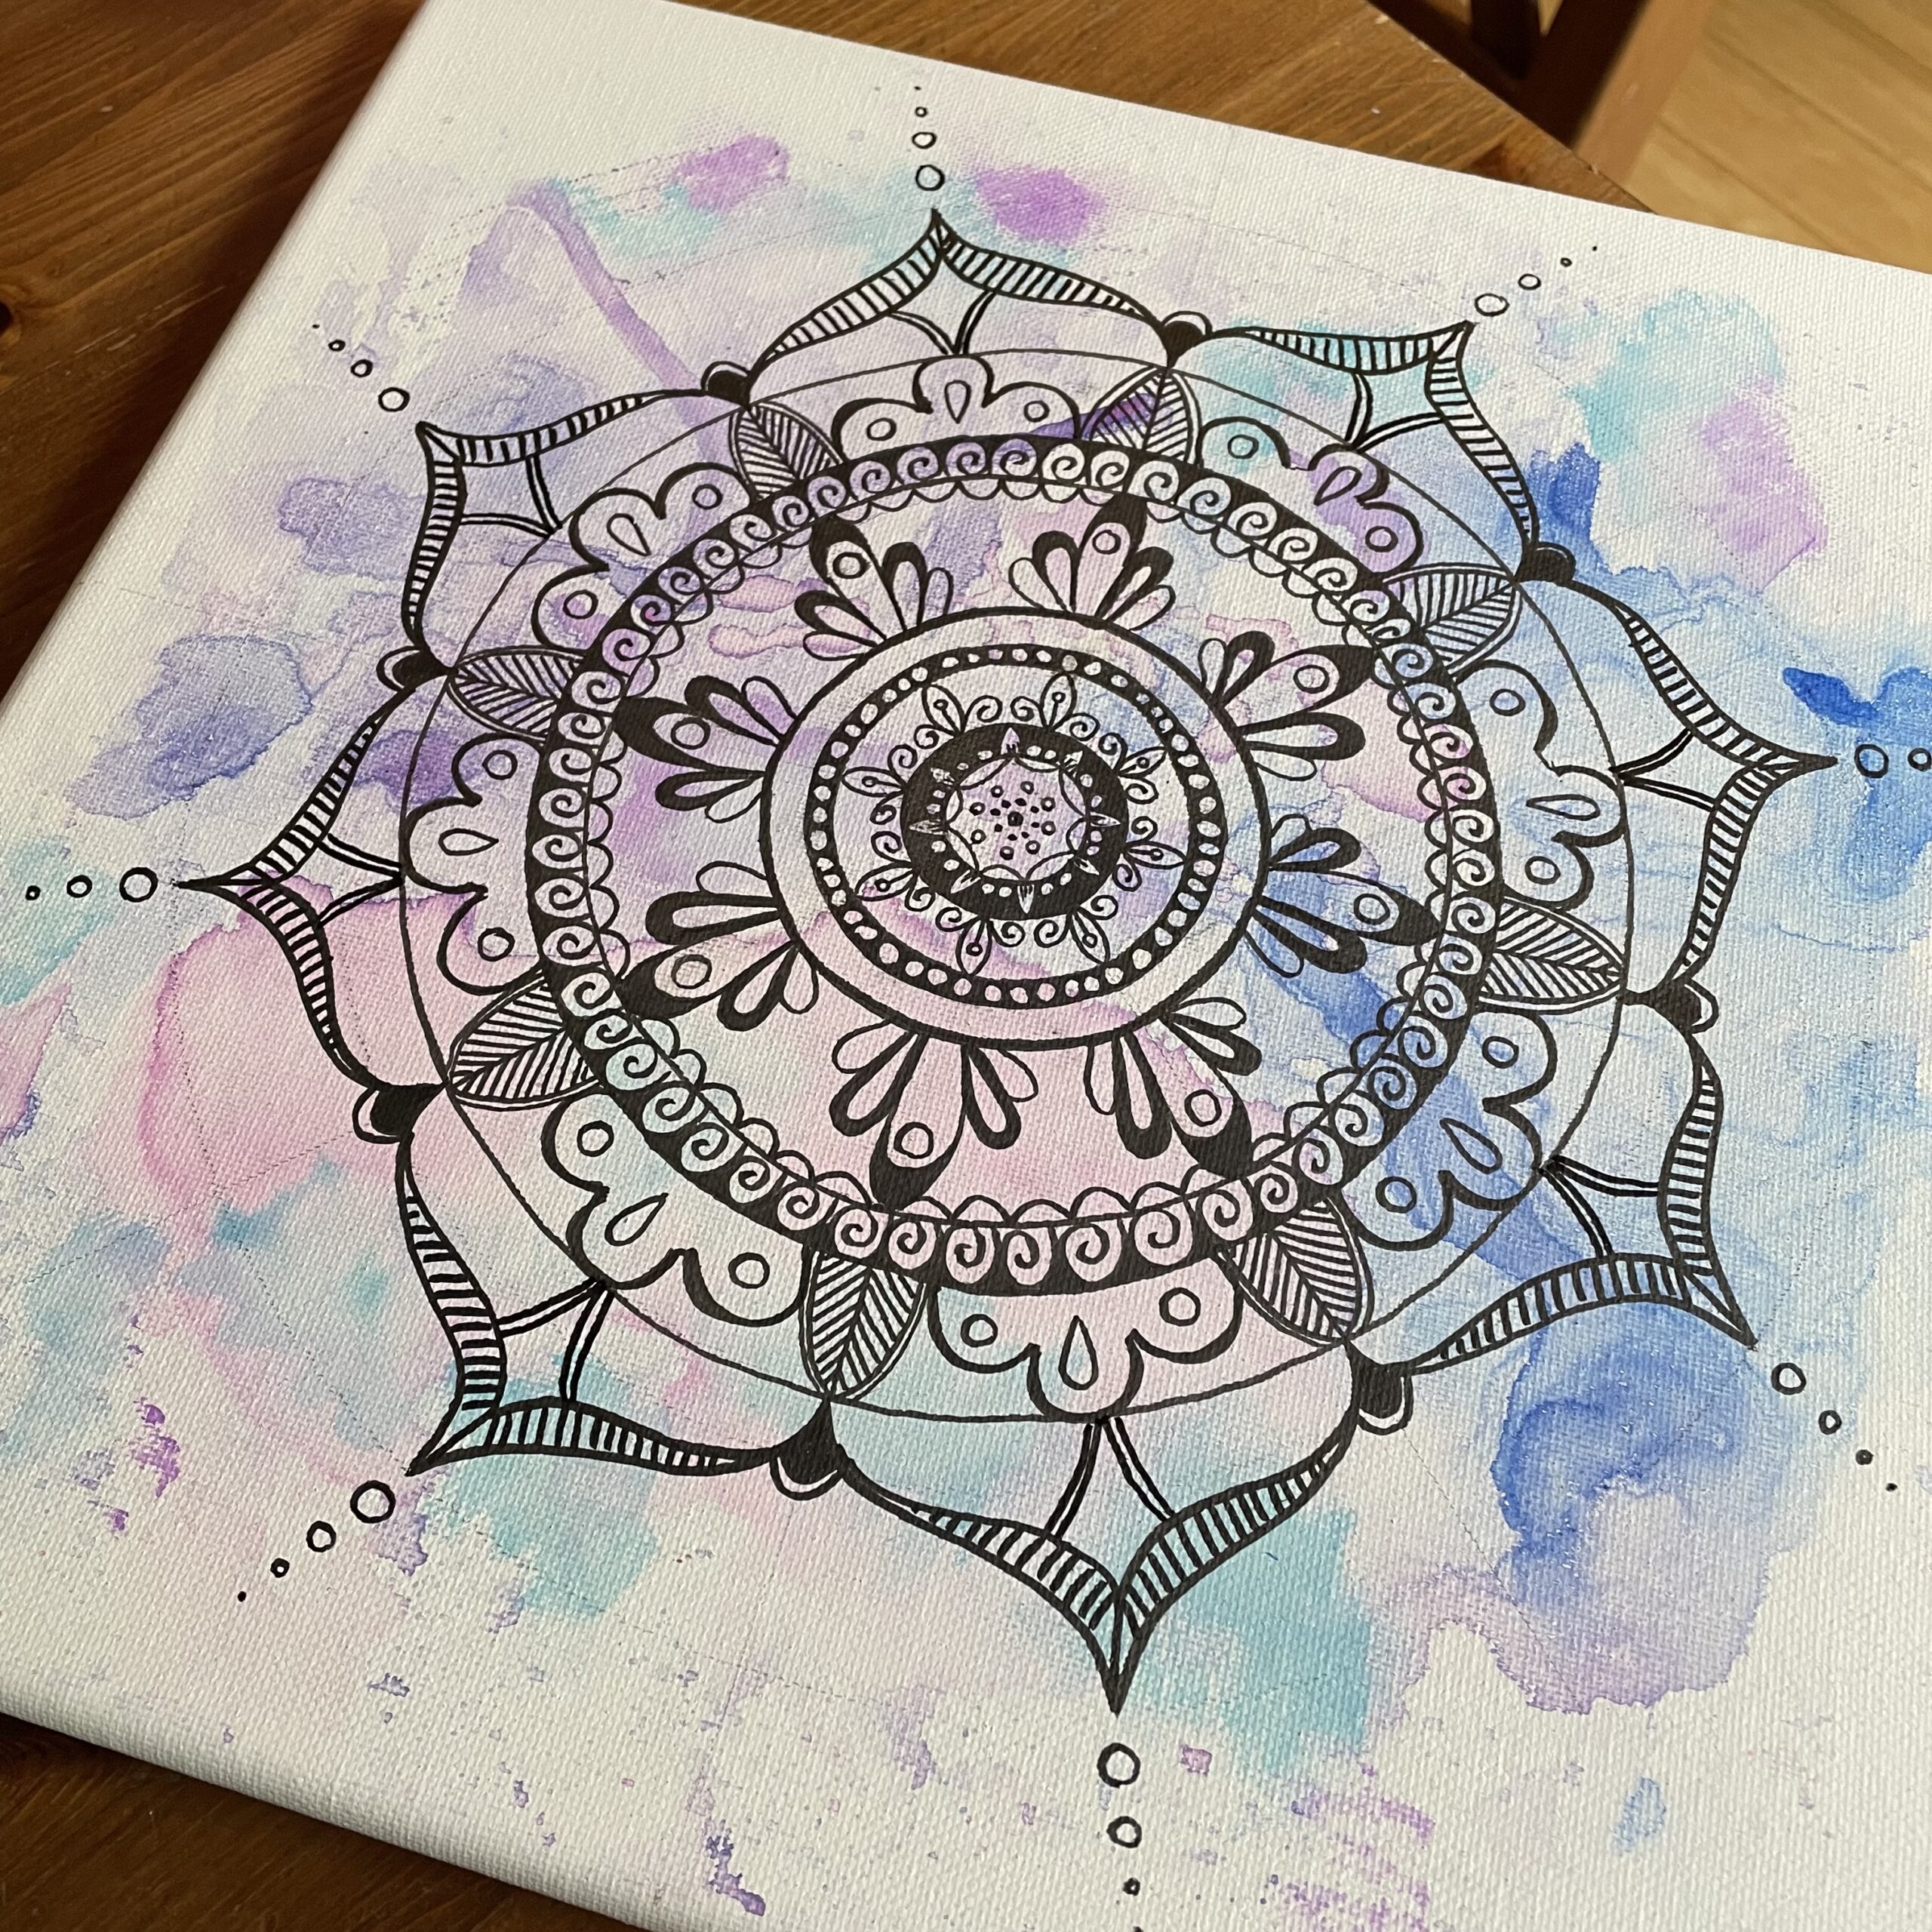
Materials needed:
ziplock bag or plastic sheet
water color markers
Spray bottle with water and paper towels
compass
ruler and pencil
This project was a test, really, to see if we get enough color on the canvas. I have to say it was very subtle, but pretty.
After we scribbled some doodles on the plastic bag or sheet, we sprayed the colors with water. Quickly turn over the sheet onto the canvas. In case the colors are not drying fast enough, you can use a hairdryer. blot with paper towels if need.
Use a ruler to determine the middle of the canvas and start making circles with the compass. Then you can start making your mandala. Look for ideas online!
14. Decoupage terra cotta pots
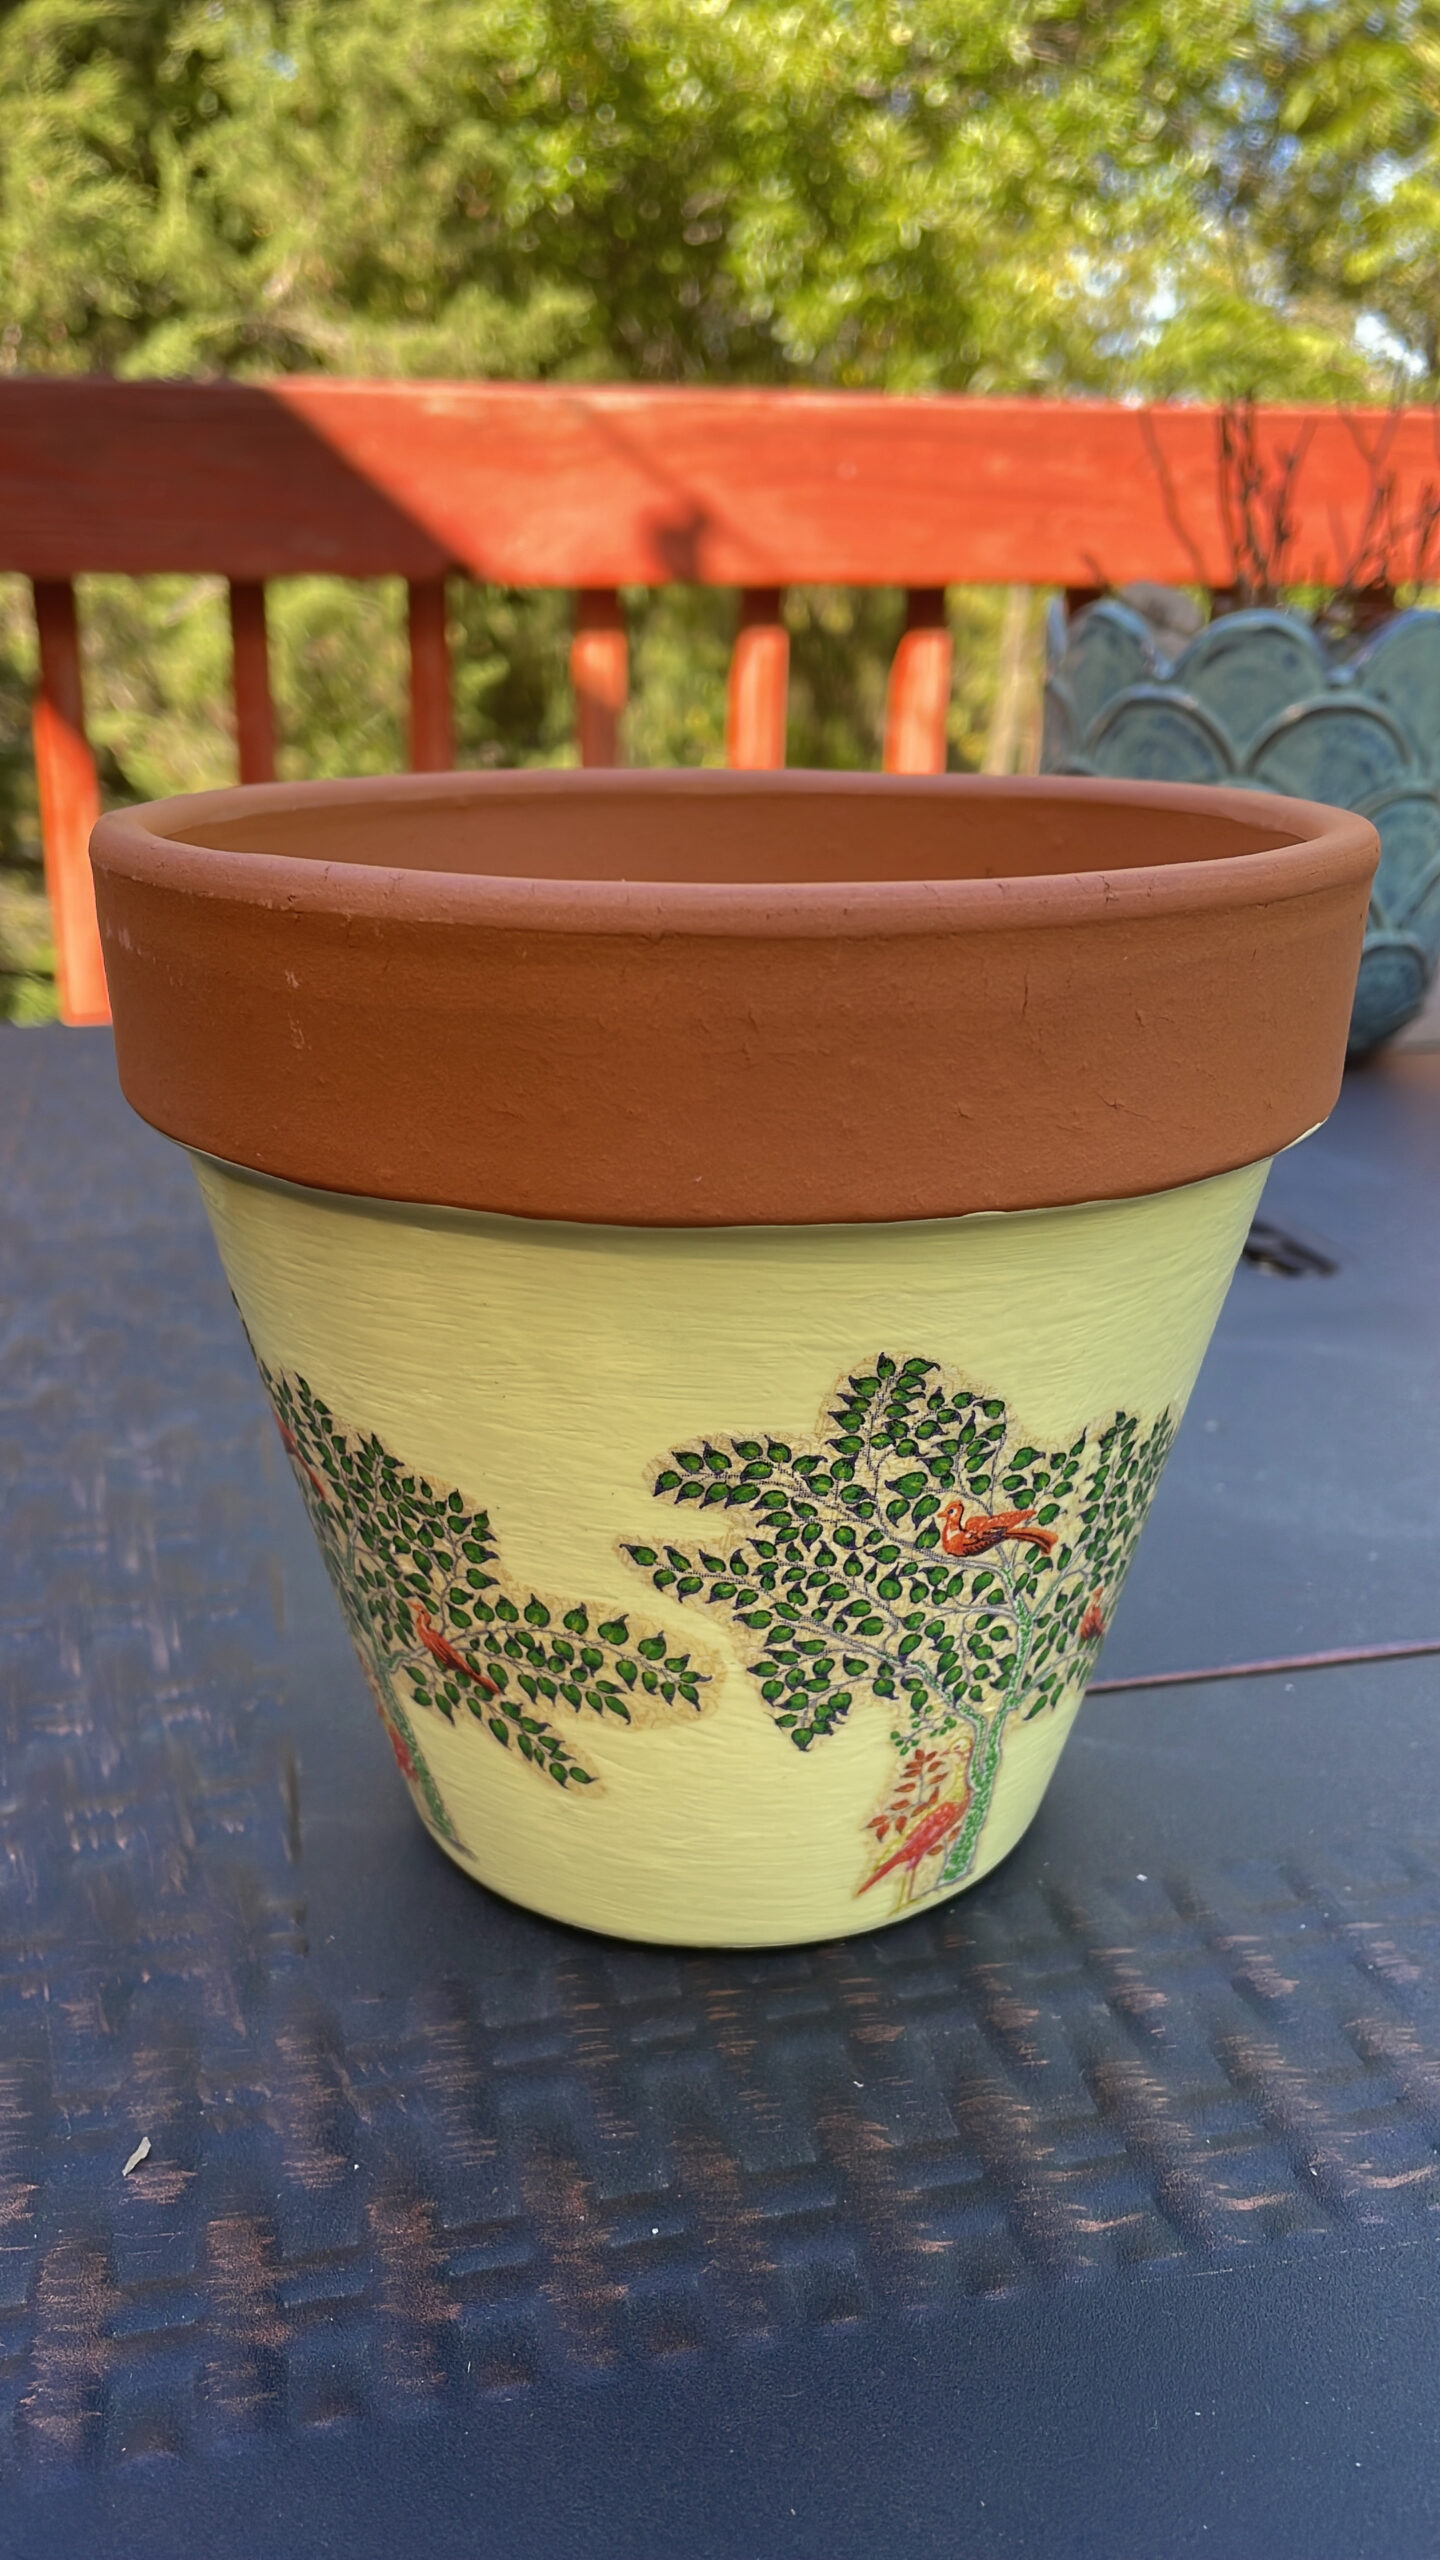
Instead of doing decoupage on candles, we used terra cotta pots. Instead of melting the candles wax, we used Mod Podge.
Materials:
terra cotta pots
Mod Podge
napkins
scissors
Brushes
Clean the pots in case they’re dirty and let dry. Paint the pot in the color you want. You might want to do a 2nd layer. While the pot is drying, cut out the desired objects from the napkins. Carefully take the first layer off from the napkin and place it on the pot. Carefully brush Mod Podge over (you can start also to put Mod Podge under) the cut out napkin. Brush Mod Podge over the entire pot, so it becomes water resistant. Let dry and ENJOY!
15. Abstract Canvas painting with tape

Sometimes people don’t feel comfortable painting on a big canvas. This is an easy project for people to start painting.
Materials:
Canvas (either size works, but I love the square ones)
Tape (I used 0.25 inches width)
Kitchen paper
Spread out kitchen paper or newspaper under your canvas. Use strips of tape to make all kinds of shapes across the canvas. Be sure to push down the tape, just in case some of the paint might seep underneath the tape. You want to create crisp lines. You can choose to create a frame with tape and for example paint the sides of the canvas black or you can continue the shapes on the sides of the canvas.
Choose your colors and mix them (don’t forget to shake the bottles, mix the paint thoroughly before painting). Start painting the shapes. I wrote down the colors in the shapes before painting, because then I could see if the colors where nicely spread out.
If the paint is still a little wet, you can take off the tape. I didn’t get crisp lines everywhere, so I touched up the lines with a very fine brush and white paint!
This post will continue…. Check it out regularly for more ideas!

Hello everyone,
Welcome to my Crafty Dutch Girl blog! Grab a cup of “koffie” and browse through fun blog posts about our Dutch family expat life in the USA, Dutch history, Dutch recipes, Dutch things to do in the USA and all kinds of crafts and activities. Don’t forget to connect with me for new ideas! “Groetjes en tot ziens”.
[…] creative or learn a new skill. This can be card making, candle making, art, or many more different kinds… Read more »
[…] creative side. One popular choice for hosting a unique and memorable event is to have a holiday craft party.… Read more »
[…] time of year can be very stressful….at work…at home. It was great to hear at one of our Craft… Read more »