
Welcome to our series of DIY Home Projects on a budget. Here you can find more of our finished projects and why we’re improving/renovating a whole house! We start off with our first project: the Bathroom.
Our upstairs bathroom was not our first choice to start these Home Improvements. The house was build in 1996, so some things were outdated or falling apart. One of the things was the bathroom faucet and leaking sink. So, instead of only buying a new faucet, we decided to move this bathroom project to the top of our list and do the whole bathroom at once.
Crafty Dutch Girl is reader-supported. When you buy through links on our site, we may earn an affiliate commission. Learn more.

How did we improve the bathroom?
First of all, as I mentioned in my previous blog post, why we started these projects and that both my husband and I have almost zero experience in renovating or improving houses. Does watching Netflix “Interior Design Masters” and “Tiny House Nation” count?
1. Planning
We had to plan quickly, because we had a leak. I forgot to mention that the toilet leaked as well! I’ve been pinning on Pinterest like a mad person. Now it was the time to show my husband all the pictures, so it gave him an idea (I just gave this tip to my mom, because she couldn’t believe that my dad didn’t understand any colors or room set up for their new house).

We also used a website called Basecamp, where you can plan out the different projects. You can make to-do-lists, assign them and put them in order of priority. You can even add documents and pictures. I printed the list out and taped it on the wall. My husband says, he needs a visual.

2. The Vanity
I wanted to do as much as we could ourselves. Because that is the Crafty Dutch Girl way! This means: on a budget, using your own ideas to make it the way you want it to. It is extra limited, because of the Corona Virus Pandemic. We tried to use the things we already had in our house as much as we could.
I started with the vanity. I looked online for new ones. Nope, not going to spend $1,000 for a nice wooden one! There was nothing broken on our old one, it was just yucky and dark.

I took the drawers out and tested how the wood would look like if I just sanded it. Actually I loved how they turned out.

I love how you can still see the dark paint in the wood grain. I decided to sand everything down with coarse sand paper and then smooth it with finer sand paper. Then I bought Vintage Wood Beeswax to make it waterproof. If you don’t find this stuff, there is this TimberISL wood conditioner on Etsy. I didn’t wanted to lose the color of the natural wood. (There are a lot of different colors of wood in our house)
Then I added new handles on the door and 2 drawers.

Until now we paid:
- Sand paper (Walmart) $4
- Oil Rubbed Bronze Cabinet Handles $3.60
- Vintage Wood Mind your own Beeswax from Amy Howard or TimberISL wood conditioner $19.28
So this was just under $30 and it looked already so different!
3. Sink and Faucet
Our old faucet was broken. It was easy for the kids to screw the white handles off (see picture below) and it leaked below the sink. I didn’t like the oval sink either, so we decided to buy a new faucet and sink at Menards.

It was not easy to get the top off. It was caulked shut! This was one of the things we’ve never done before, so we watched a YouTube video and this one.
We noticed that it could be different for every sink and vanity top. For example, we didn’t have the water knobs under the sink, so we had to turn off the general water supply instead.
After a good amount of (literally) blood, sweat and swear words, we managed to get the vanity top off with least amount of wall damage.

After scraping off rests of caulk we put on the new top. It fit!!! But the faucet didn’t (we didn’t know there was a different in spaces of the holes pre-made in the vanity top). We watched another video about how to install a faucet. In the meantime we waited until our new faucet arrived.
TIP: Before putting the top on, install parts of the faucet already, so you don’t have to, when the top is already on the vanity base.
After caulking the vanity top and filling the holes in the walls, it looked so much better!
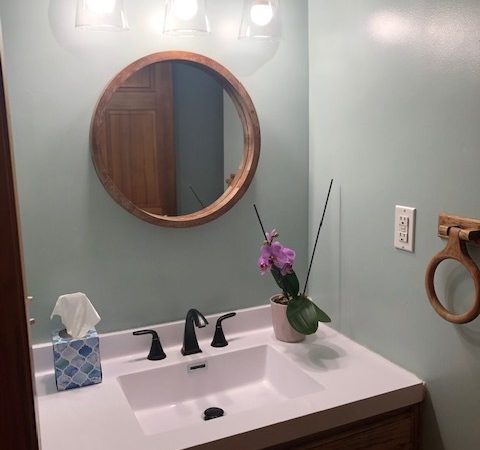
We decided to get rid of the mirror also. We weren’t using the cabinet behind the mirror anyway and it looked bulky. I like the round, wooden mirrors. Two people were needed to take this monster down. Take security precautions when working with electricity.
We got new lights and these on Etsy look similar.
Costs until now:
- Sink $120
- Faucet $ 80
- Caulk $2.50
- Mirror $60
- Vanity Lights $103
Total of: $365.50
4. The walls
The old walls were creamy white. We decided to paint them “Silvered Sage” from DutchBoy. It was a little tricky, because the bathroom is small and we didn’t know if the color would jump on you. You know what I mean? Maybe in a few months I can change one wall to white or “shiplap” or “board and batten”. I was afraid it looked too cold with that much color on all the walls. Maybe it won’t bother me, but just in case, I have other options;)

- KrudKutter $ 5.00
- Dutch Boy Bath/Kitchen Paint $27.75
- Roller and brushes kit $ 5.00
- Painters tape $ 3.00
Total of: $40.75
5. The Floor
Since I saw stenciled tiles, I’ve been obsessed. They look so fun! It’ll definitely make the room more light and fresh.
I’ve watched some You Tube videos (see video below), because I wasn’t sure if the floor at a certain point, will fade or chip or scrape the paint off, because this bathroom is our guest room and our kids bathroom.
This was very helpful, so I did all the steps.
- Sand the tiles.
- Vacuum and clean with “Krudkutter”
- Taped the walls off. (I wanted the baseboards to be white, just like the floors)

- Painted the floor twice with Rustoleum Chalked “Linen White”.
- Used a stencil from Cutting Edge Stencils for tiles. (their stencils are manufactured to order, so it took a few days for processing and shipping)
- I used a foam roller and a stencil brush for the stenciling.
- I touched up especially the sides and around the toilet.
- Then I used Polycrylic Minwax to seal the whole floor.
And here is the result!

- Stencil (we needed a 12×12 inch one) $16.50
- Rustoleum Linen White $15.00
- Rustoleum Aged Gray $19.00
- Polycrylic Minwax $24.20
- Foam roller and stencil brush $18.00
Total of: $92.70
6. Miscellaneous little things
There is 1 small window in the bathroom and to make it brighter, I painted the trim white.
I kept the towel and toilet paper roll hangers. They were the same color brown as the vanity. I assumed the wood would look the same, so I sanded them down and waterproofed the wood with the Vintage Wood Beeswax. (Or TimberISL wood conditioner)
I mentioned before that our toilet was leaking. We got a new one, which was nice, because it seemed that the old one was there when the house was build.
Some smaller things we bought also for the bathroom.
- 2 electrical outlets $ 2.00
- New rugs $ 30.00
- Vent Cover (check the sizes) $ 10.20
- 2 wooden shelving above the toilet $ 15.00
- new toilet $180.00
Total of: $ 237.00
So total of this bathroom make over was:
$ 736.00
Another thing we would like to change in the future is, to take the bathtub out and put in a walk-in shower. But that will be another story:)
Thanks for checking in with me. Please comment below or follow me on Facebook. Hope to see you at our next project: THE MASTER BEDROOM! (coming soon)


Hello everyone,
Welcome to my Crafty Dutch Girl blog! Grab a cup of “koffie” and browse through fun blog posts about our Dutch family expat life in the USA, Dutch history, Dutch recipes, Dutch things to do in the USA and all kinds of crafts and activities. Don’t forget to connect with me for new ideas! “Groetjes en tot ziens”.