I really hope you have some time these days at the end of the year to make these cute, awesome and adorable crafts. Some of them we made at our weekly Craft Party. Everyone loved the idea to start early on these Christmas DIY Crafts and decide if they wanted to give them away as gifts or keep them. So lets get started.
Preparations and other materials
This time of year can be very stressful….at work…at home. It was great to hear at one of our Craft Parties: ”Wow, I really needed this today!!” in the last few weeks. It has been so fun to leave troubles behind for a few hours once a week and just make cool things and hang out with friends.
We’re getting closer to the end of the year and I was thinking to make adorable (and useful) Holiday or Christmas decorations or gifts. A 12 days before Christmas DIY Craft Party!
It doesn’t matter if you organize these crafts for a Craft Party or making these by yourself. Important is to get prepared and get the materials on time. I would also suggest to make an example for your Craft Party, because you’ll have an example and you can figure out what goes well, what needs a little tweaking here and there.
Crafty Dutch Girl is reader-supported. When you buy through links on our site, we may earn an affiliate commission. Learn more.
Day 1 Advent Calendars, 3 ways!
Tree
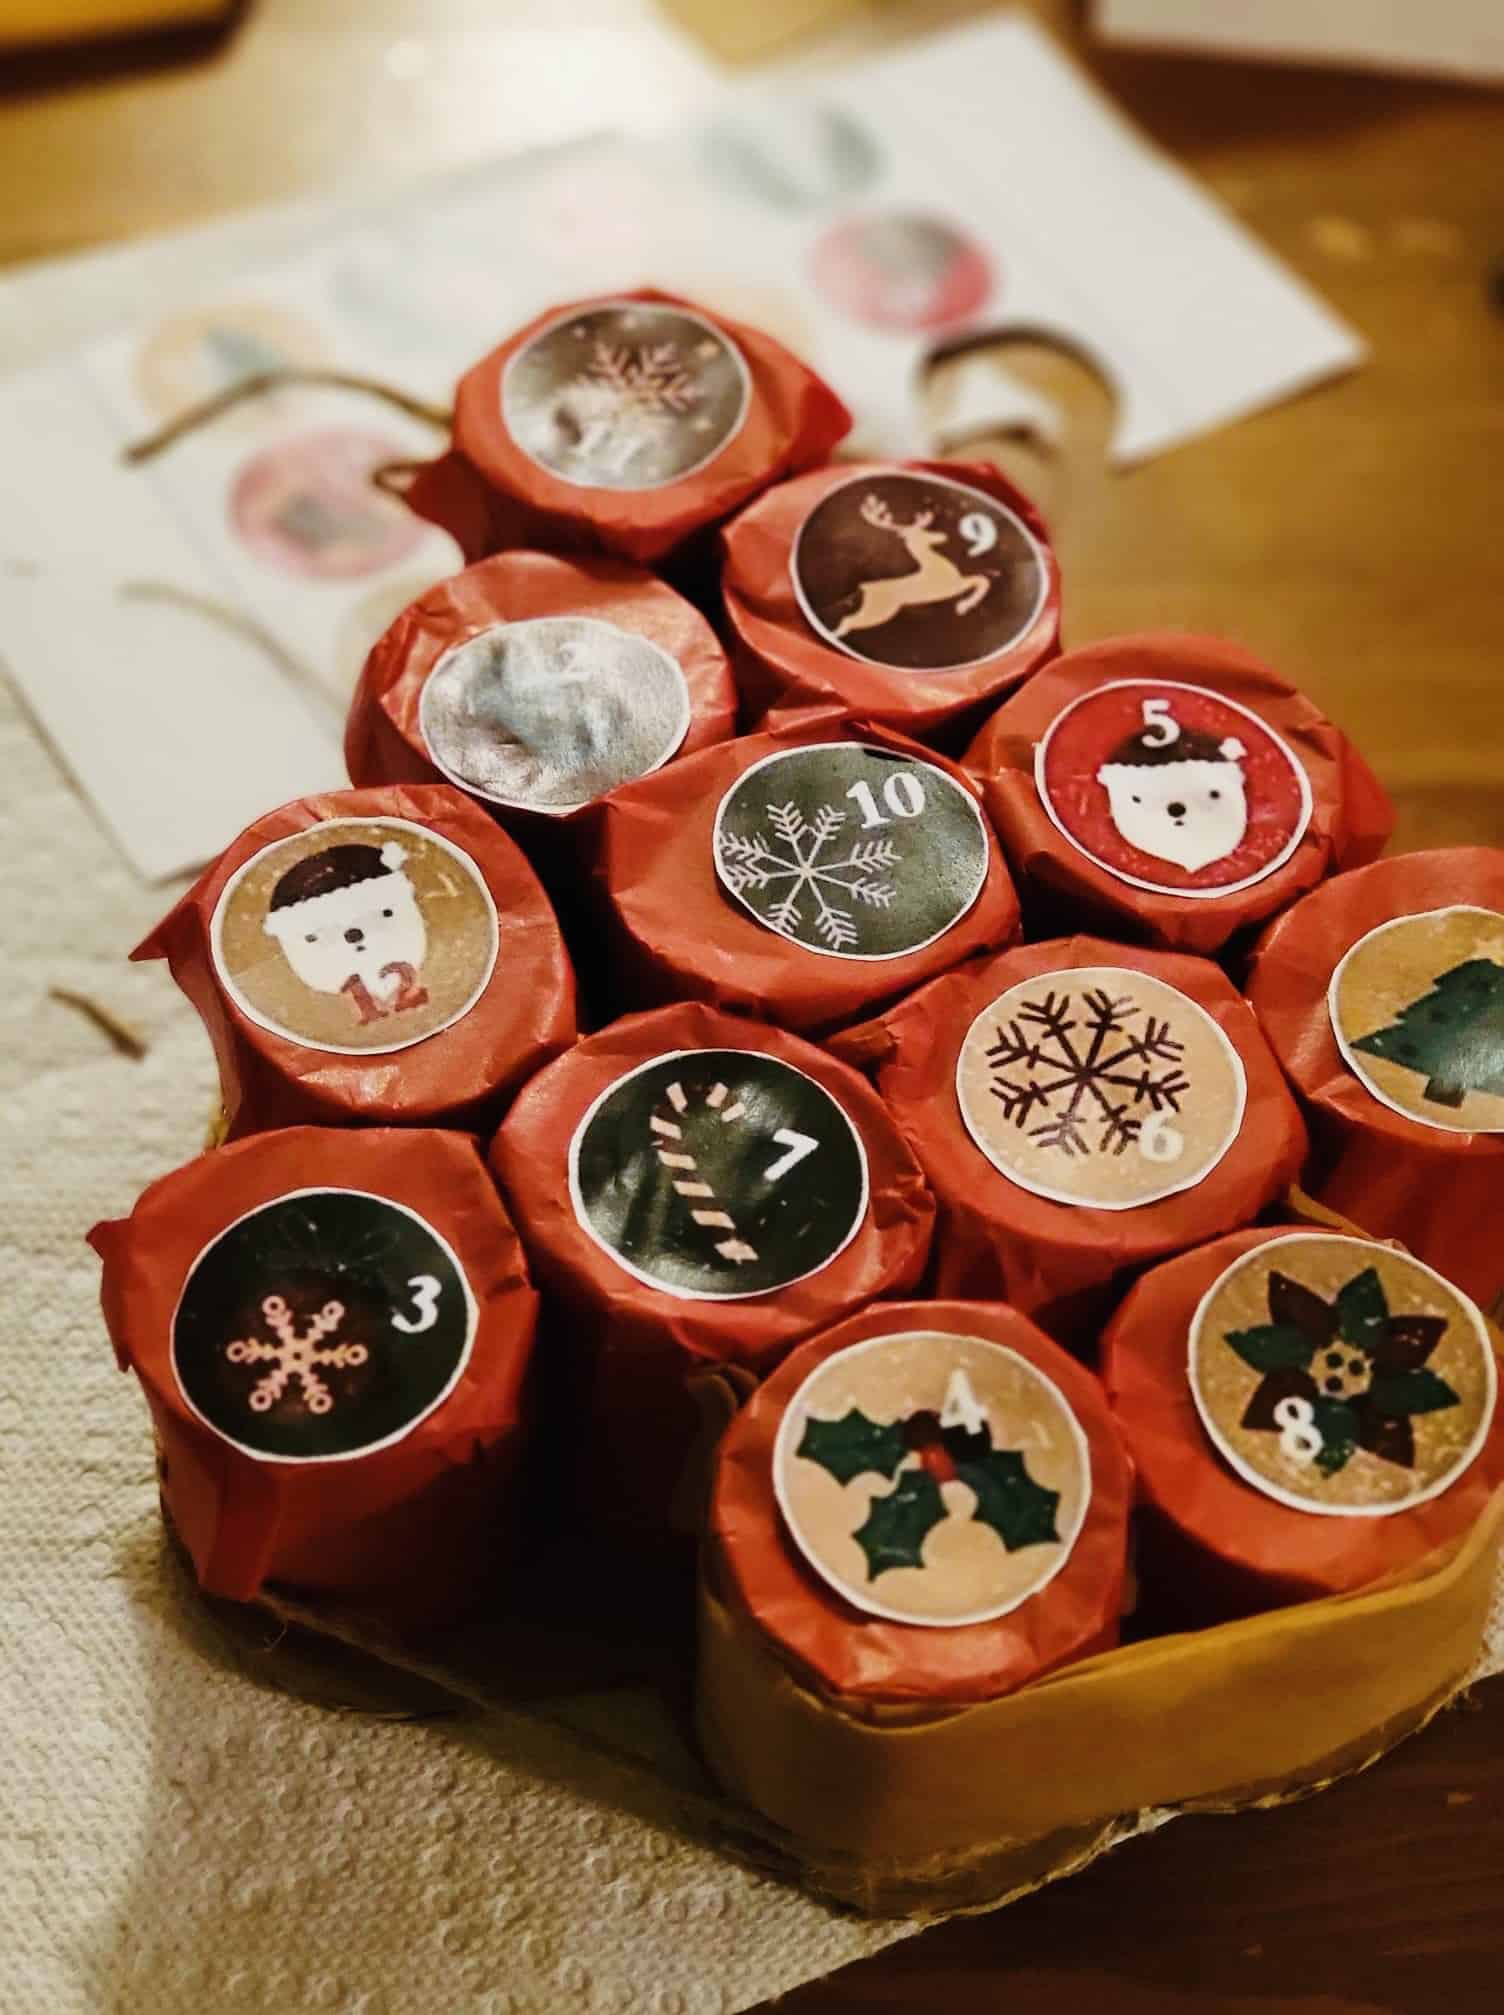
Materials:
- Toilet paper or kitchen towel rolls
- paper or cardboard
- pencil
- scissors and x-acto knife.
- stapler
- wrapping paper
- glue
- tissue paper
- Printable Number 1-25
and small goodies of course
For this project you’ll need 25 toilet paper rolls. Put them in the shape of a tree. You can wrap each one in a piece of tissue paper and glue the printed number on the tissue paper.
Another way of doing this is, staple the toilet rolls together in the tree shape and cover the fronts with the tissue paper and glue the numbers on the paper. Then glue the rolls together. The front will closed with the paper and numbers, so the only way of putting goodies in the paper rolls, is through the back. When all the goodies are in, you can close the back with sturdy paper or cardboard.
This tree can stand up or you can hang it up. Poke through the paper to get the present!
Another option in case you have the toilet paper rolls, are folding the rolls on the bottom and top. The kids can decorate the front.
Cracker Style
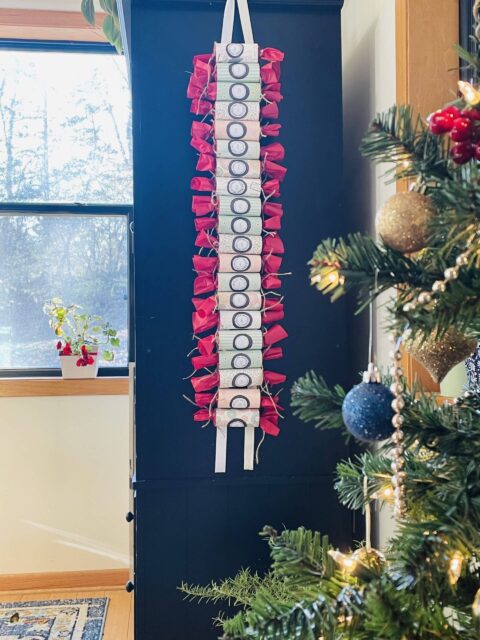
Materials:
- 25 kitchen paper rolls
- tissue paper
- scrap book paper
- glue
- ribbons
- Numbers
and some goodies of course.
Wrap each roll in tissue paper and leave one side open, like a holiday cracker. Tie one side shut with a piece of ribbon or twine. After adding the goodies, you can tie the end shut too. Wrap scrap book paper around the middle of the roll. Add a number (see the ones under the first Advent Calendar option). You can glue the rolls together (doesn’t have to be in order) and glue them on a long piece of ribbon, so it’ll be easier to hang on the wall or side of a closet.
Houses
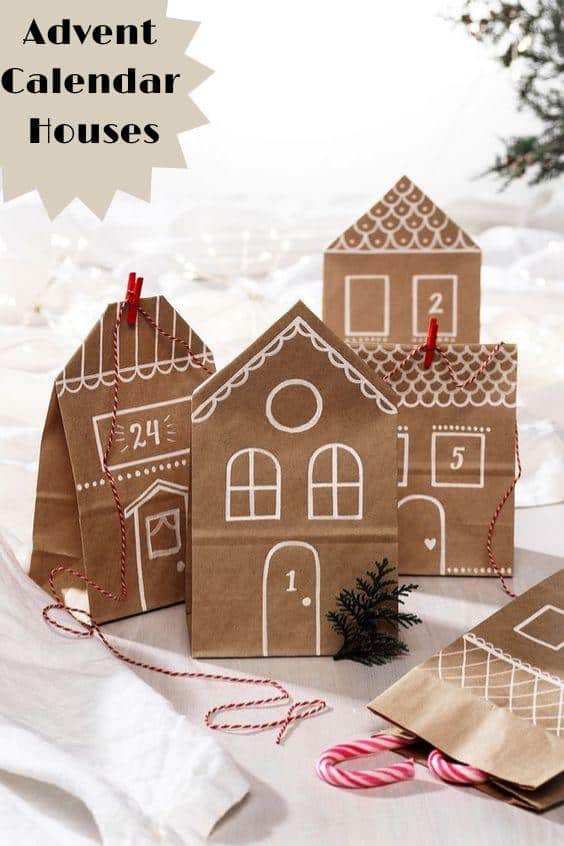
Materials:
- paper lunch bags
- string
- stapler
- small wooden cloth pins
- white pens, paint or pencils
- old picture frame or branch/stick
and some goodies of course
You can make the bags as small or big as you want to. You can fold the top (after adding the goodies) into little houses, or just decorate them however you want. Don’t forget the numbers (find a printable under the first Advent Calendar option).
Zig-zag the twine or small ribbon on the back of the empty frame with a stapler and add the paper bags to the ribbon with the wooden cloth pins. Or hang the houses from a branch with ribbons or twine.
In case you don’t have lunch bags, these adorable houses you can fold into an advent calendar and hang on a beautiful branch in your house. I just had to show you these!
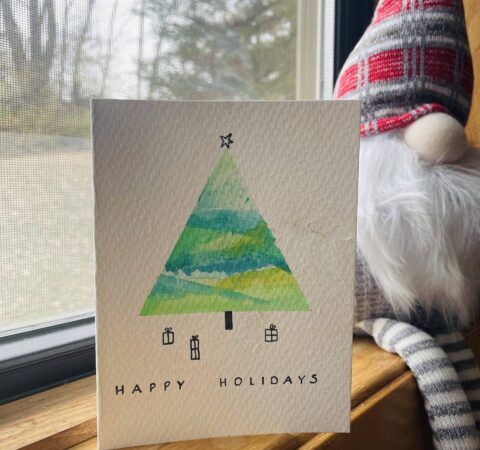
Day 2 Watercolor Christmas Cards
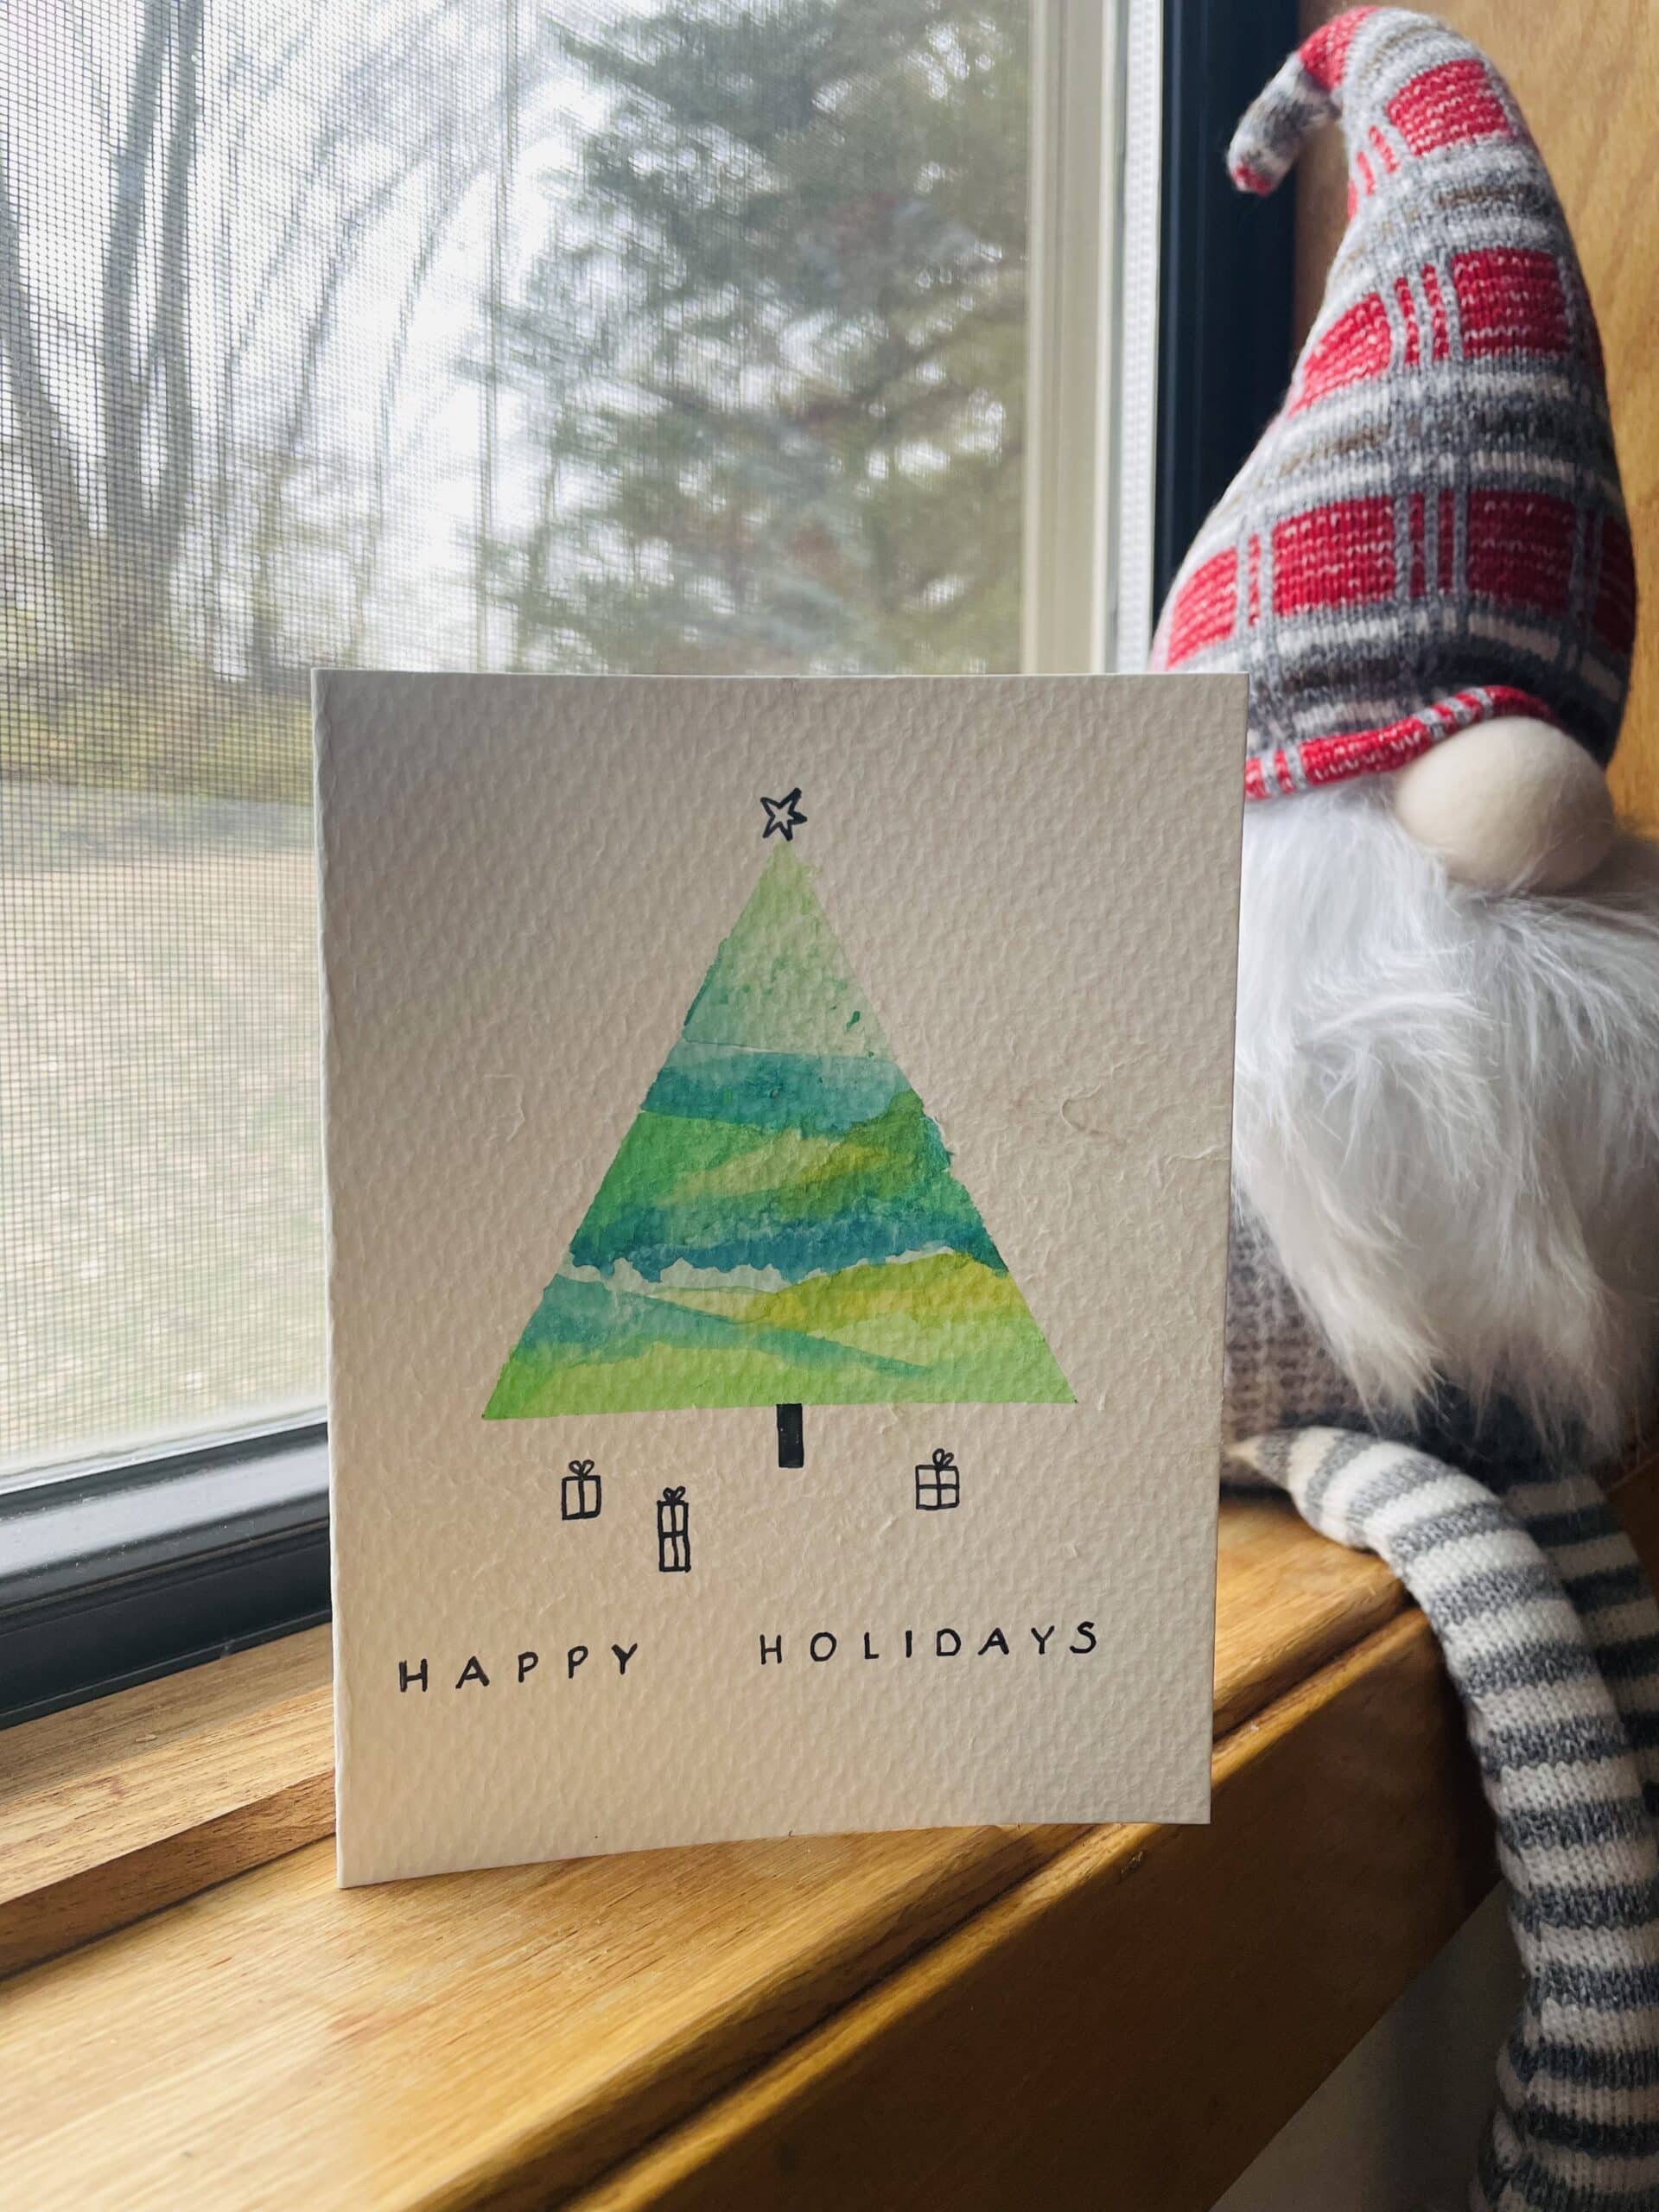
Materials:
- Water color paper
- Scissors
- Watercolor set
- Masking Tape
- Black Fine Liners
- Ruler
- Pencil
You can play a little with how you want your cards to look like. Normally watercolor paper comes in a block with rectangle pages. You can fold long side to long side and cut the folded page in half.
Find the middle of the top of your card and measure about 1 inch down. This will be the top of your Christmas tree. Measure the same distance from each side of the card where the other 2 corners of the tree are going to be.
Some people like a skinny tree, some wider. That’s up to you. Use the tape to tape of a triangle, by connecting the dots.
Mix colors you like to paint your triangle with water colors. Start light (more water) and use more saturated paint at a few places. BTW the tree doesn’t have to be green 😉
After you carefully dabbed the excess water with a tissue or kitchen paper, carefully take the tape off. You should have a nice crisp triangle. Now you can decorate the 🌲 with black fine liner.
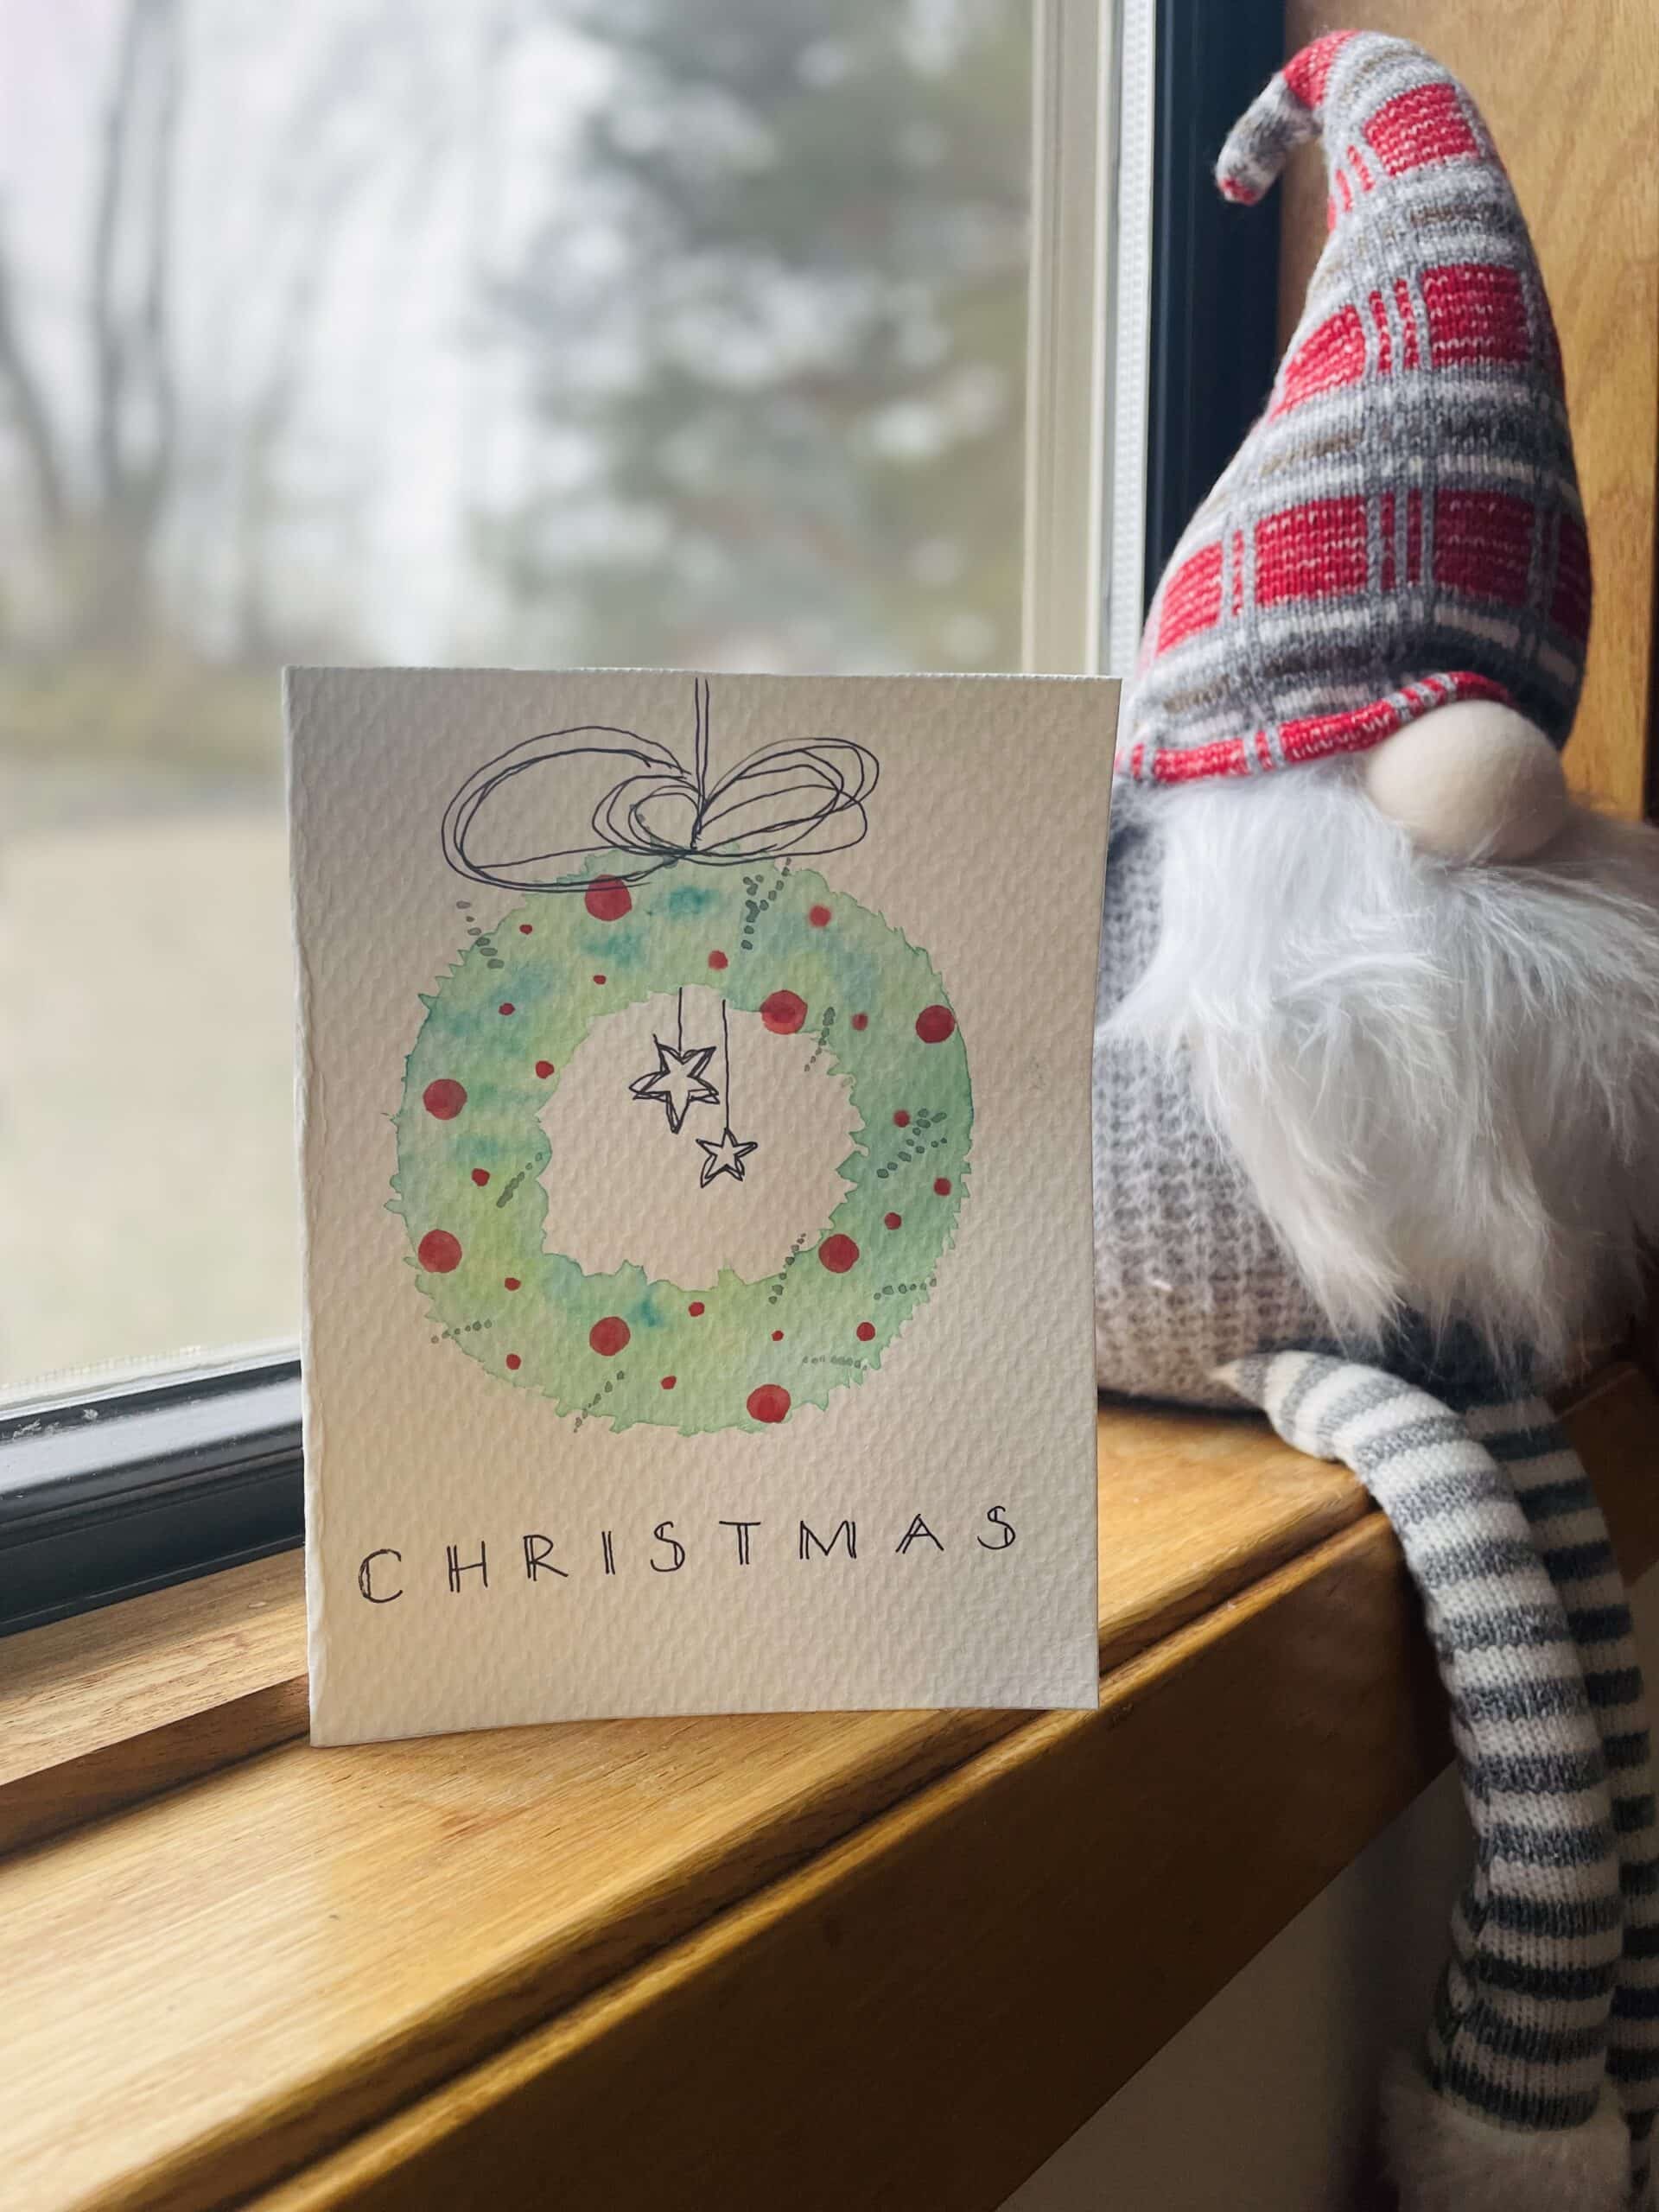
Materials:
- Watercolor paper
- Water color set
- Brushes
- Left over beads or diamonds from a diamond painting set.
- A cup or something else round
- Black Fine Liners
This one is more freestyle.
Start with the cup or round item you have on hand. Use pressure lightly, because you might see the lines through the watercolor paint. You can use a bigger brush to make lighter green undertone for the wreath. Then a smaller brush with darker green to make pine needles. Decorate with whatever you like: a ribbon, berries (paint or diamonds), glitter, stars. And don’t forget to write a nice wish or the person’s name if it is a placement card.
Day 3 Clay Ornaments or Gift Tags
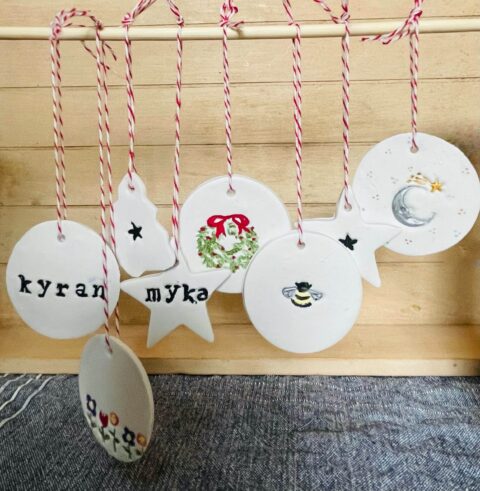
Materials:
- White Clay (oven bake)
- Small cookie cutters
- Skewer
- Stamps
- rolling pin with guide
- (Baking) Twine
- Parchment paper
- Tape
- Small Brushes
- Acrylic paint
For this oven baked clay, the oven needed to be preheated to 275F (135 C).
First I taped some parchment paper onto the table. Then I took a piece of clay and warmed it up in my hands by kneading it. I rolled out the clay with a rolling pin. It had rings on the side as a guide, so the clay would be an even thickness.
With the different cookie cutters, cut out as many shapes as you want. Don’t forget to poke a hole in the top of your ornament with the skewer (not the pointy side).
Use stamps to make designs on your ornaments. Press lightly and evenly!
Carefully move the ornaments onto a baking sheet with parchment paper and bake them for 12 minutes or whatever it says on the package. Let cool!
In the meantime you can cut the twine for your ornaments and get paint and brushes ready.
Paint your ornaments with a very fine brush. I bet permanent markers will work as well.
Add the twine and you’re done!
TIP: If you like painting, especially watercolors and advent calendars? Here is a fun way of painting your advent calendar day-by-day!
I’ll start tomorrow! 👉🏼 Watercolor Advent Calendar
Day 4 Crochet Christmas Tree

Materials:
- Any kind of yarn
- Crochet needles
- Tapestry needle
- Beads
It was so fun to see people who never crochet before, had so much fun making these cute little trees.
First make a chain of about 100. It depends on how big you’d like to make the trees. The smaller the crochet needle and thinner the yarn, the smaller the trees will be.
This video shows how to make a chain and a row of half double crochet.
And that’s actually it.
Cut the yarn at the end and pull through the last loop. Knot the beginning and the end string together into a loop.
This part is a little tricky and you might need a few tries (at least I did).
Start with the top and zig-zag your crochet string until you get a tree shape. You can use a skewer or long needle to hold the shape of the tree.
Thread a needle with thin twine or the yarn you used for crocheting the tree. Start with 2 beads for the stem and work your way up to the top of the tree alternating beads in between the “tree branches”.
You could use some glue to glue the end of the branches together.
And that’s it!
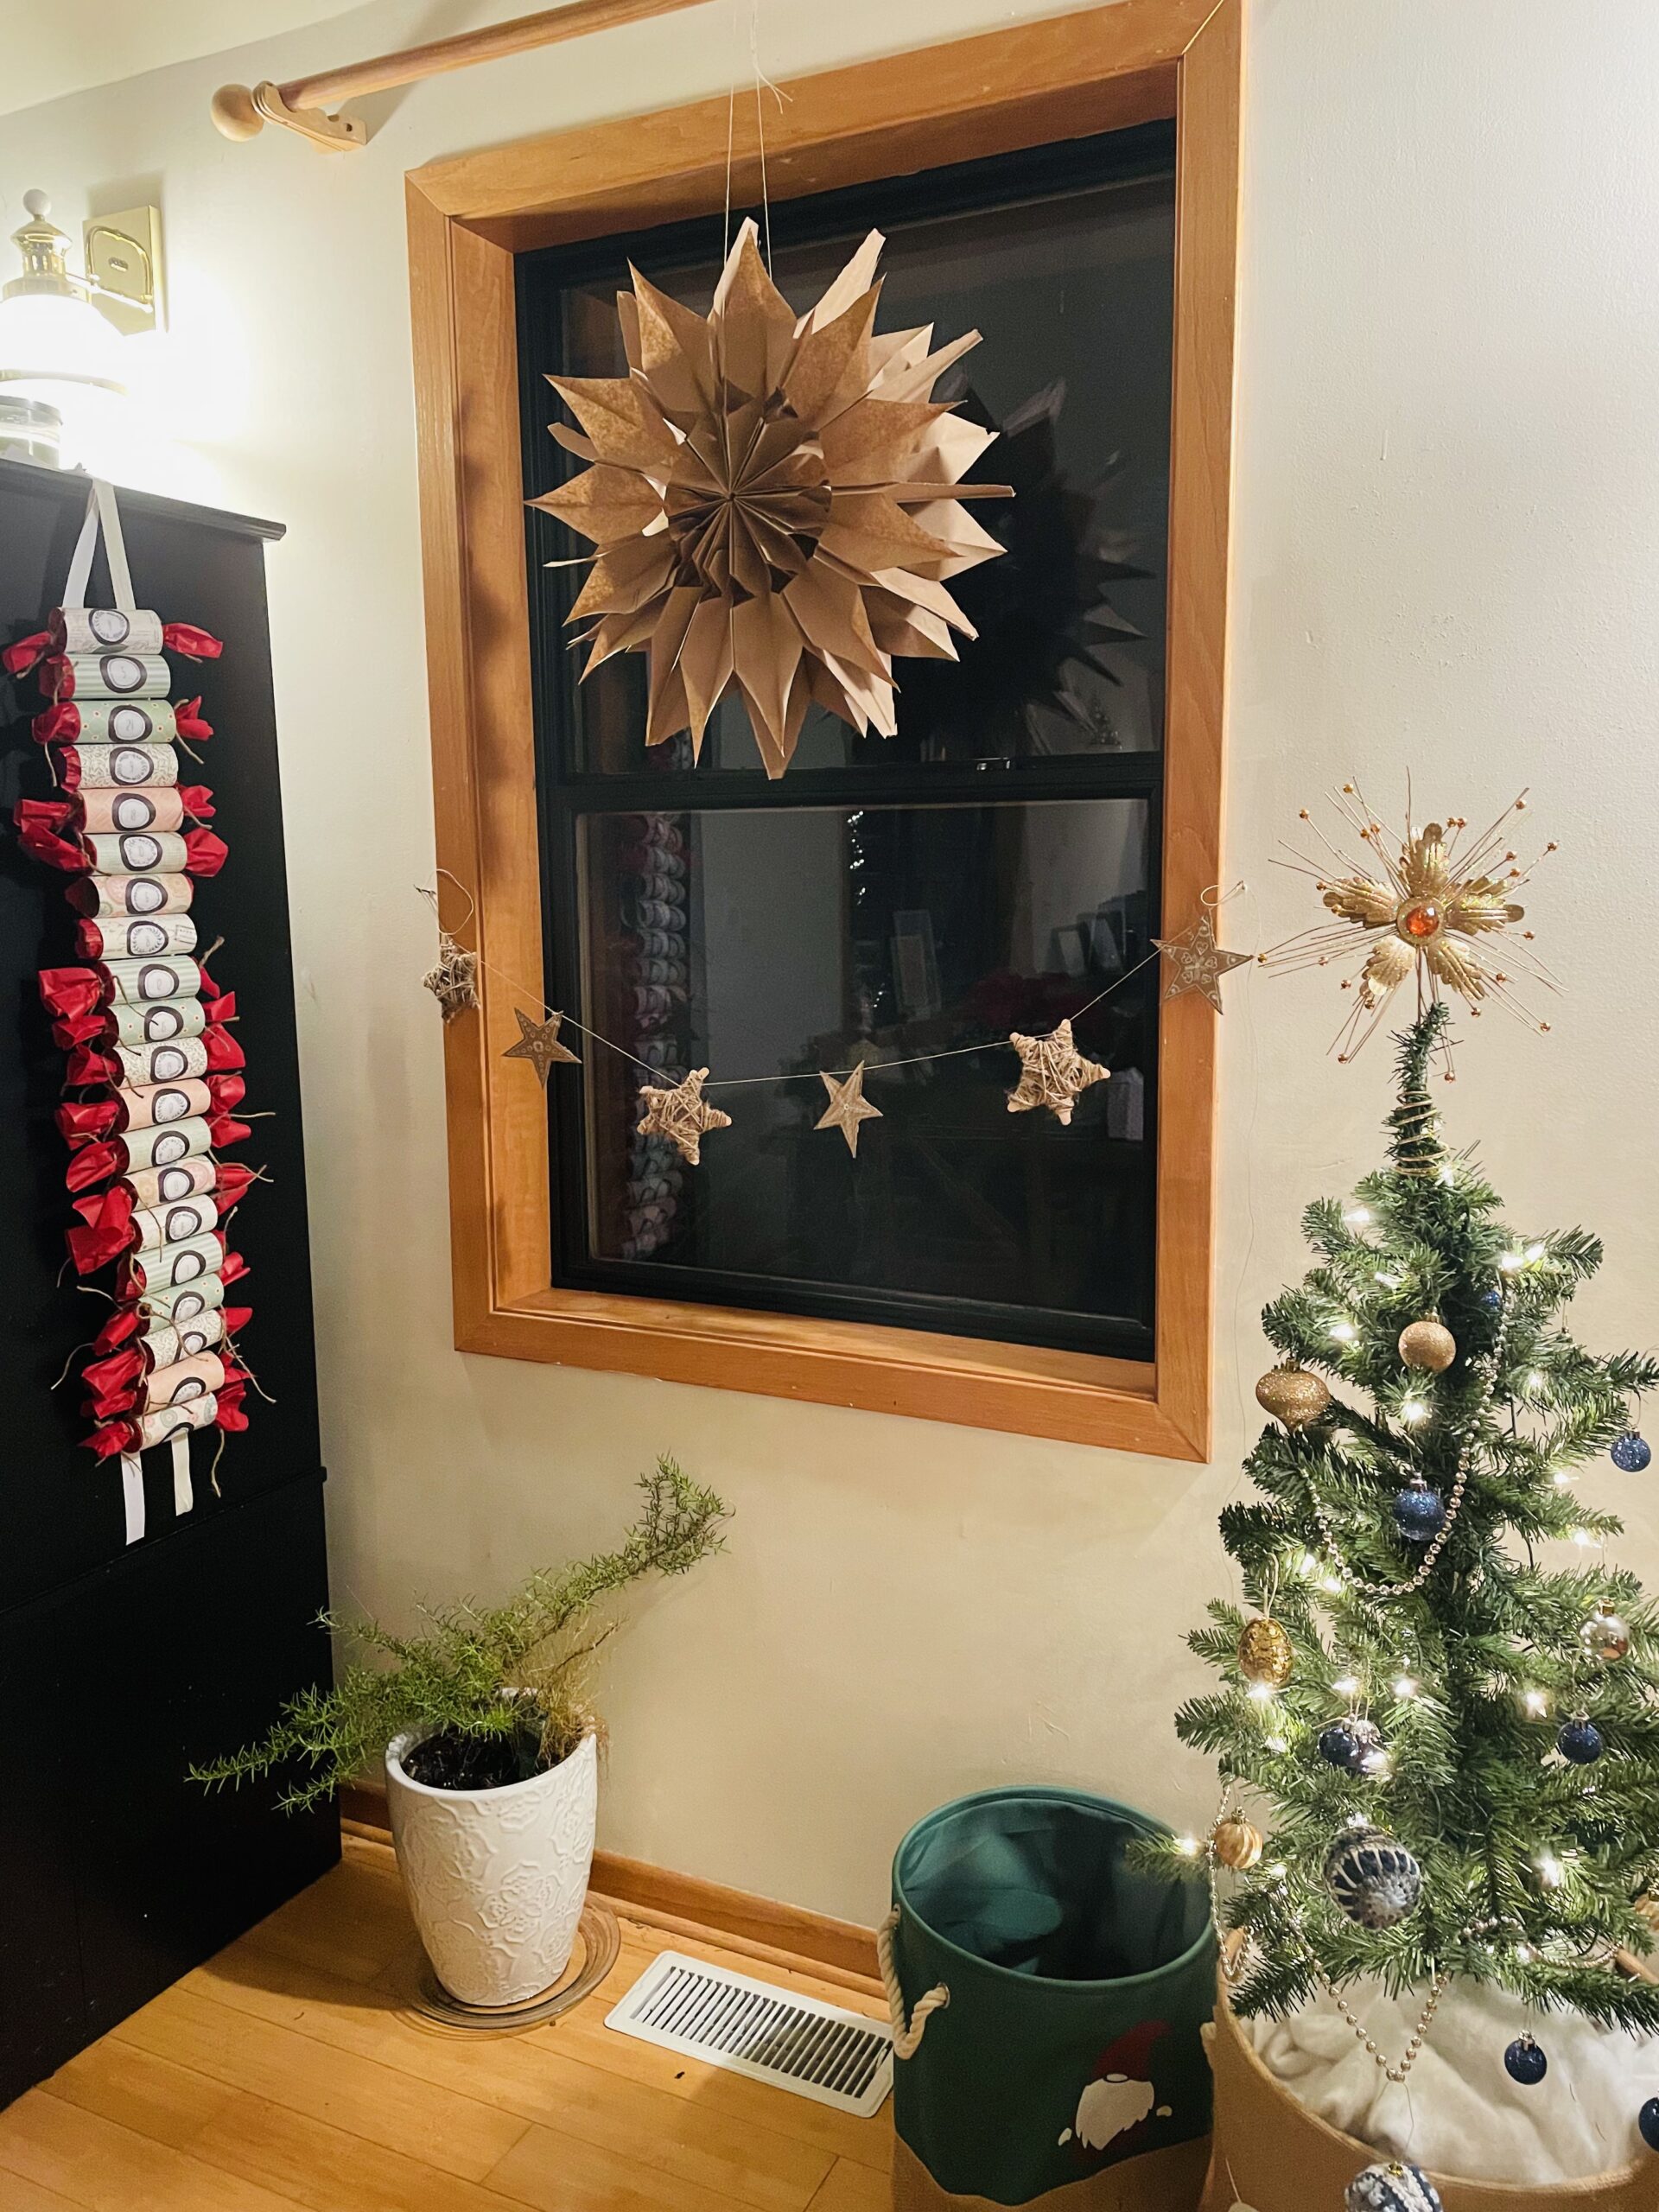
Day 5 Paper Stars
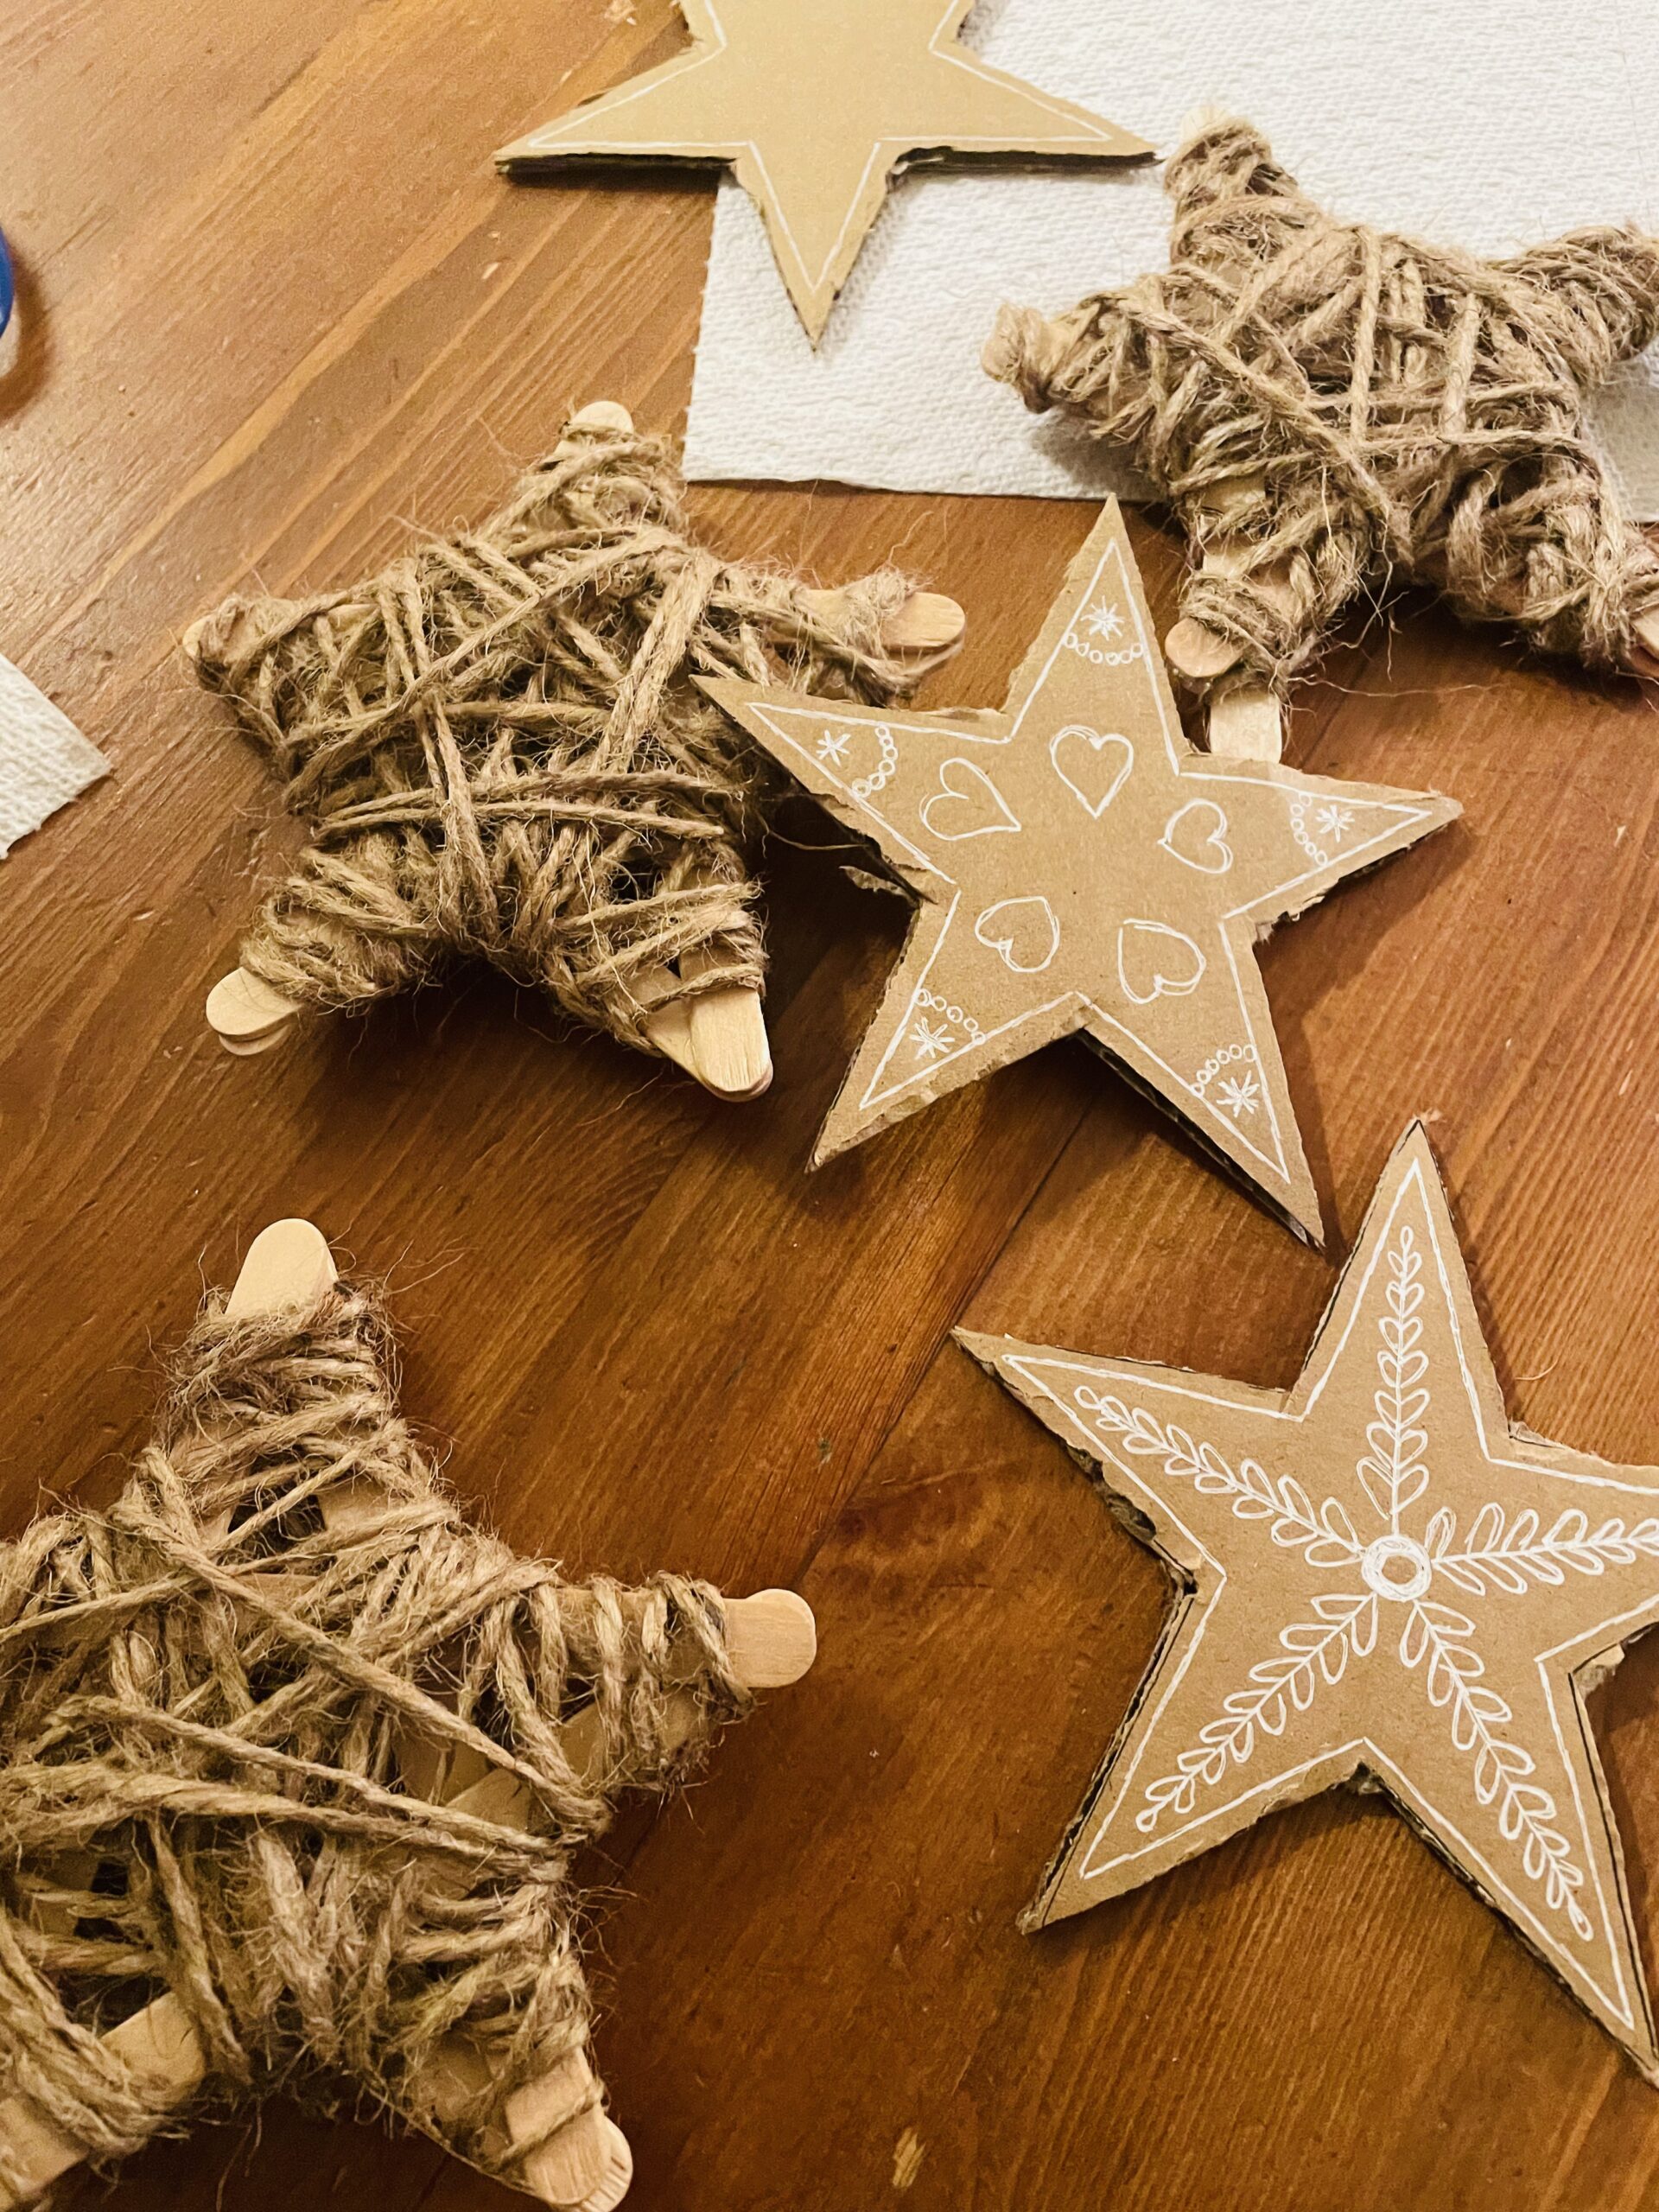
Materials:
- Any kind of paper, like scrapbook paper or card stock .
- Scissors
- Glue
- Twine
- Bone Folder
- White pens
I like the way Scandinavian Christmas decoration looks. Very neutral, cute and simple. That’s why I think it looks amazing to keep these stars in brown an white colors, but of course you can choose whatever you want. “Chalking up Success” has a great tutorial.
A few years ago I collected 7 different kinds of paper stars to make. Just in case you’re up for a challenge!
At our Craft Party we made several stars too. The most magical was the big one made with paper lunch bags. When it unfolds….just woooww! 👇🏻
We also tried cardboard stars decorated with white pens and popsicle sticks (outline of the star) with twine!
Day 6 Easy NO sew Gnomes
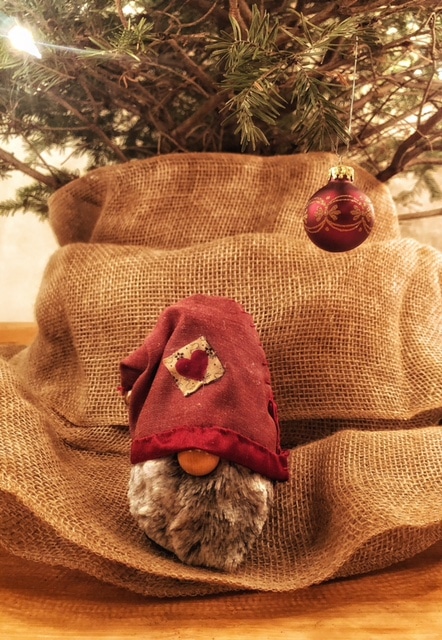
Materials:
- white sock
- rice
- spoon
- twine or ribbon
- fabric for the hat
- bell
- scissors
- fake fur
- wooden bead
- glue
During COVID we started a Craft Party on Zoom. It was fun, because it was nice to see everyone again. People had tea, coffee or wine next to them. It was snowing and we talked and made these gnomes in the meantime.
First fill the sock up with rice (about 2/3) Some socks give way a little, so you need a little more rice. Tighten the top with a knot. For extra security, you can use the extra sock part to pull over the rice filled part and tighten with a piece of twine or ribbon.
Cut a triangle piece out for the beard and glue it on the part where the face could be. Add the wooden bead.
Cut out a triangle for the hat, which fits around the head. Decorate with anything you like (I made a patch on the front and a bell on the tip of the hat).
Your gnome is done!
Day 7 Holiday or Winter Wreath
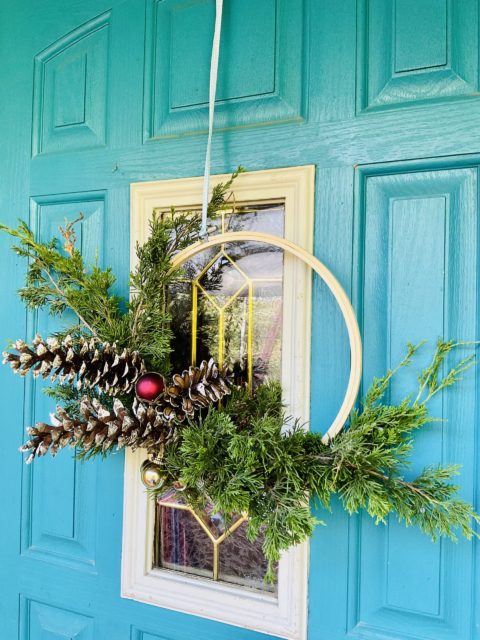
Materials:
- Base (could be a store bought wreath, an embroidery hoop or even a metal clothes hanger)
- greens like pine, or holly. Can be real or fake.
- Any decorations you like (ornaments, ribbons, pinecones etc)
- green metal thread.
This was our first craft for an indoor Craft Party last year right before the Holidays. Someone just gave me boxes full of ornaments and plain wreath bases.
I went around the garden to cut off some fresh, amazing smelling pine twigs.
For the store bought wreaths, I added the pine twigs into the base of the wreath and added the ornaments, pine cones and ribbon with the green thread.
Sometimes it’s nice to see some of the base you’re using ( I wouldn’t recommend this for the clothes hanger, but you can shape it nice and round to get a great wreath base).
Here is a video I made with wreaths for every season. In this video, I used an embroidery hoop and I like the way it looks with part of the wreath just not decorated.
It’s your own personal choice and ideas. Sometimes it helps when you let it hang on the door or window and see for a few days how it looks. You can always add or take away things, if needed.
Day 8 Christmas Paper Baubles
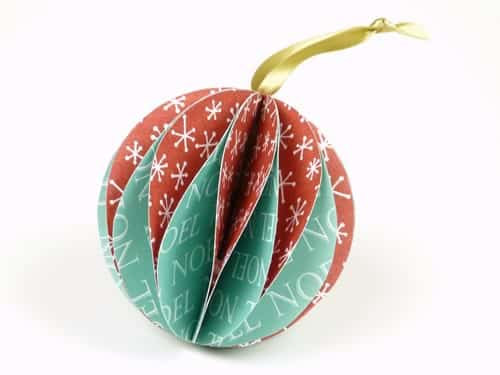
Materials:
- Round cup (about 2 1/2 or 3 inches in diameter)
- Scrapbook paper
- Glue or glue dots
- Pencil
- Scissors
A few years ago I crochet around existing ornament balls and I gave them as a gift to my coworkers. It was so much fun to do, but I was wondering if this project would have been to hard for beginner crochet friends.
If you are interested and would like to try the Crochet Baubles, then Annie Design Crochet has a free pattern you can use.
I was thinking to keep it easy and simple, so here is the tutorial for Paper Baubles.
You can use 2 different colors or pattern of paper. Try out all kinds of different color and pattern combinations or leave it in just one color.
The picture above has 2 different patterns. Draw 6 circles of each color/pattern. Cut the circles out and fold each circle in half. Stack them inside each other and tie a string or metal twin around the middle (for hanging up).
Start on the right side of the circle and add a glue dot on about a third of the right edge of the circle. Fold the flaps together and add a glue dot on the next half circle about 2/3 of the right side. Keep folding and alternating the placement of the glue dots.
More pictures to make this Christmas Paper Baubles.
Day 9 Christmas Trees
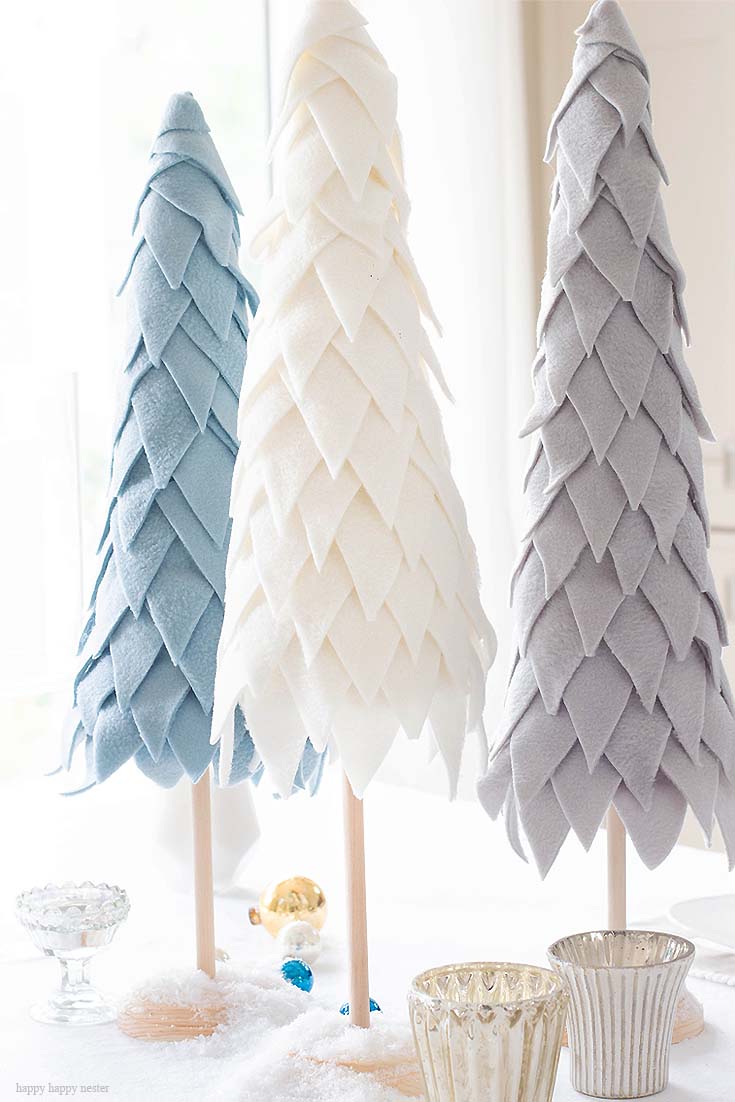
Materials:
- Cones
- Whatever materials you like to work with (paper, yarn, feathers, fabric, beads, ribbons etc.)
- hot glue plus hot glue gun
- skewer and pots or candle stick holder
You can go in all directions with this craft. The picture above, I thought is amazing!
A lot of Christmas tree Cone crafts are far more simple.
- You can dip yarn in glue and wrap it around the cone. Decorate with beads, small pompous or sequences.
- If you cut all kinds of leaf or pine like greens out of felt and glue them on the cone. Start on the bottom and layer the leaves until the cones is covered.
- Wrap the cone in fabric of choice,
- Cover the cone with shells, or feathers or buttons.
Just use your imagination!
Day 10 Dutch Paper Houses
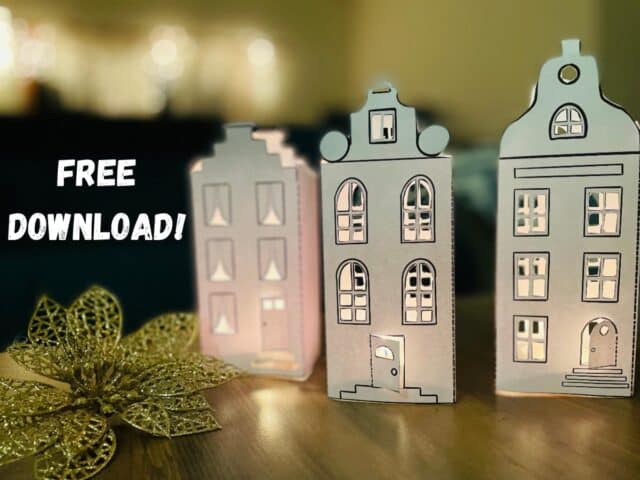
Materials:
- Template of the three houses.
- Printer
- White or brown paper
- Scissors
- Glue
- White gel pens or paint and brushes
- X-acto knife
- Cutting mat
For this craft you can use white card stock paper or maybe brown card stock paper.
Download the template (see list of materials) and print them on a piece of cardstock.
Cut them out, but don’t fold them yet.
You can either color the houses, decorate them with whatever you like or keep it simple.
If you want to use the brown card stock, it can be fun to make details with white pens or white paint beautiful.
Fold the houses and glue them together.
Add a glass with a tea light for a lovely effect at night.
Have fun and see you next time!
Day 11 Mini Crochet Stocking Ornament
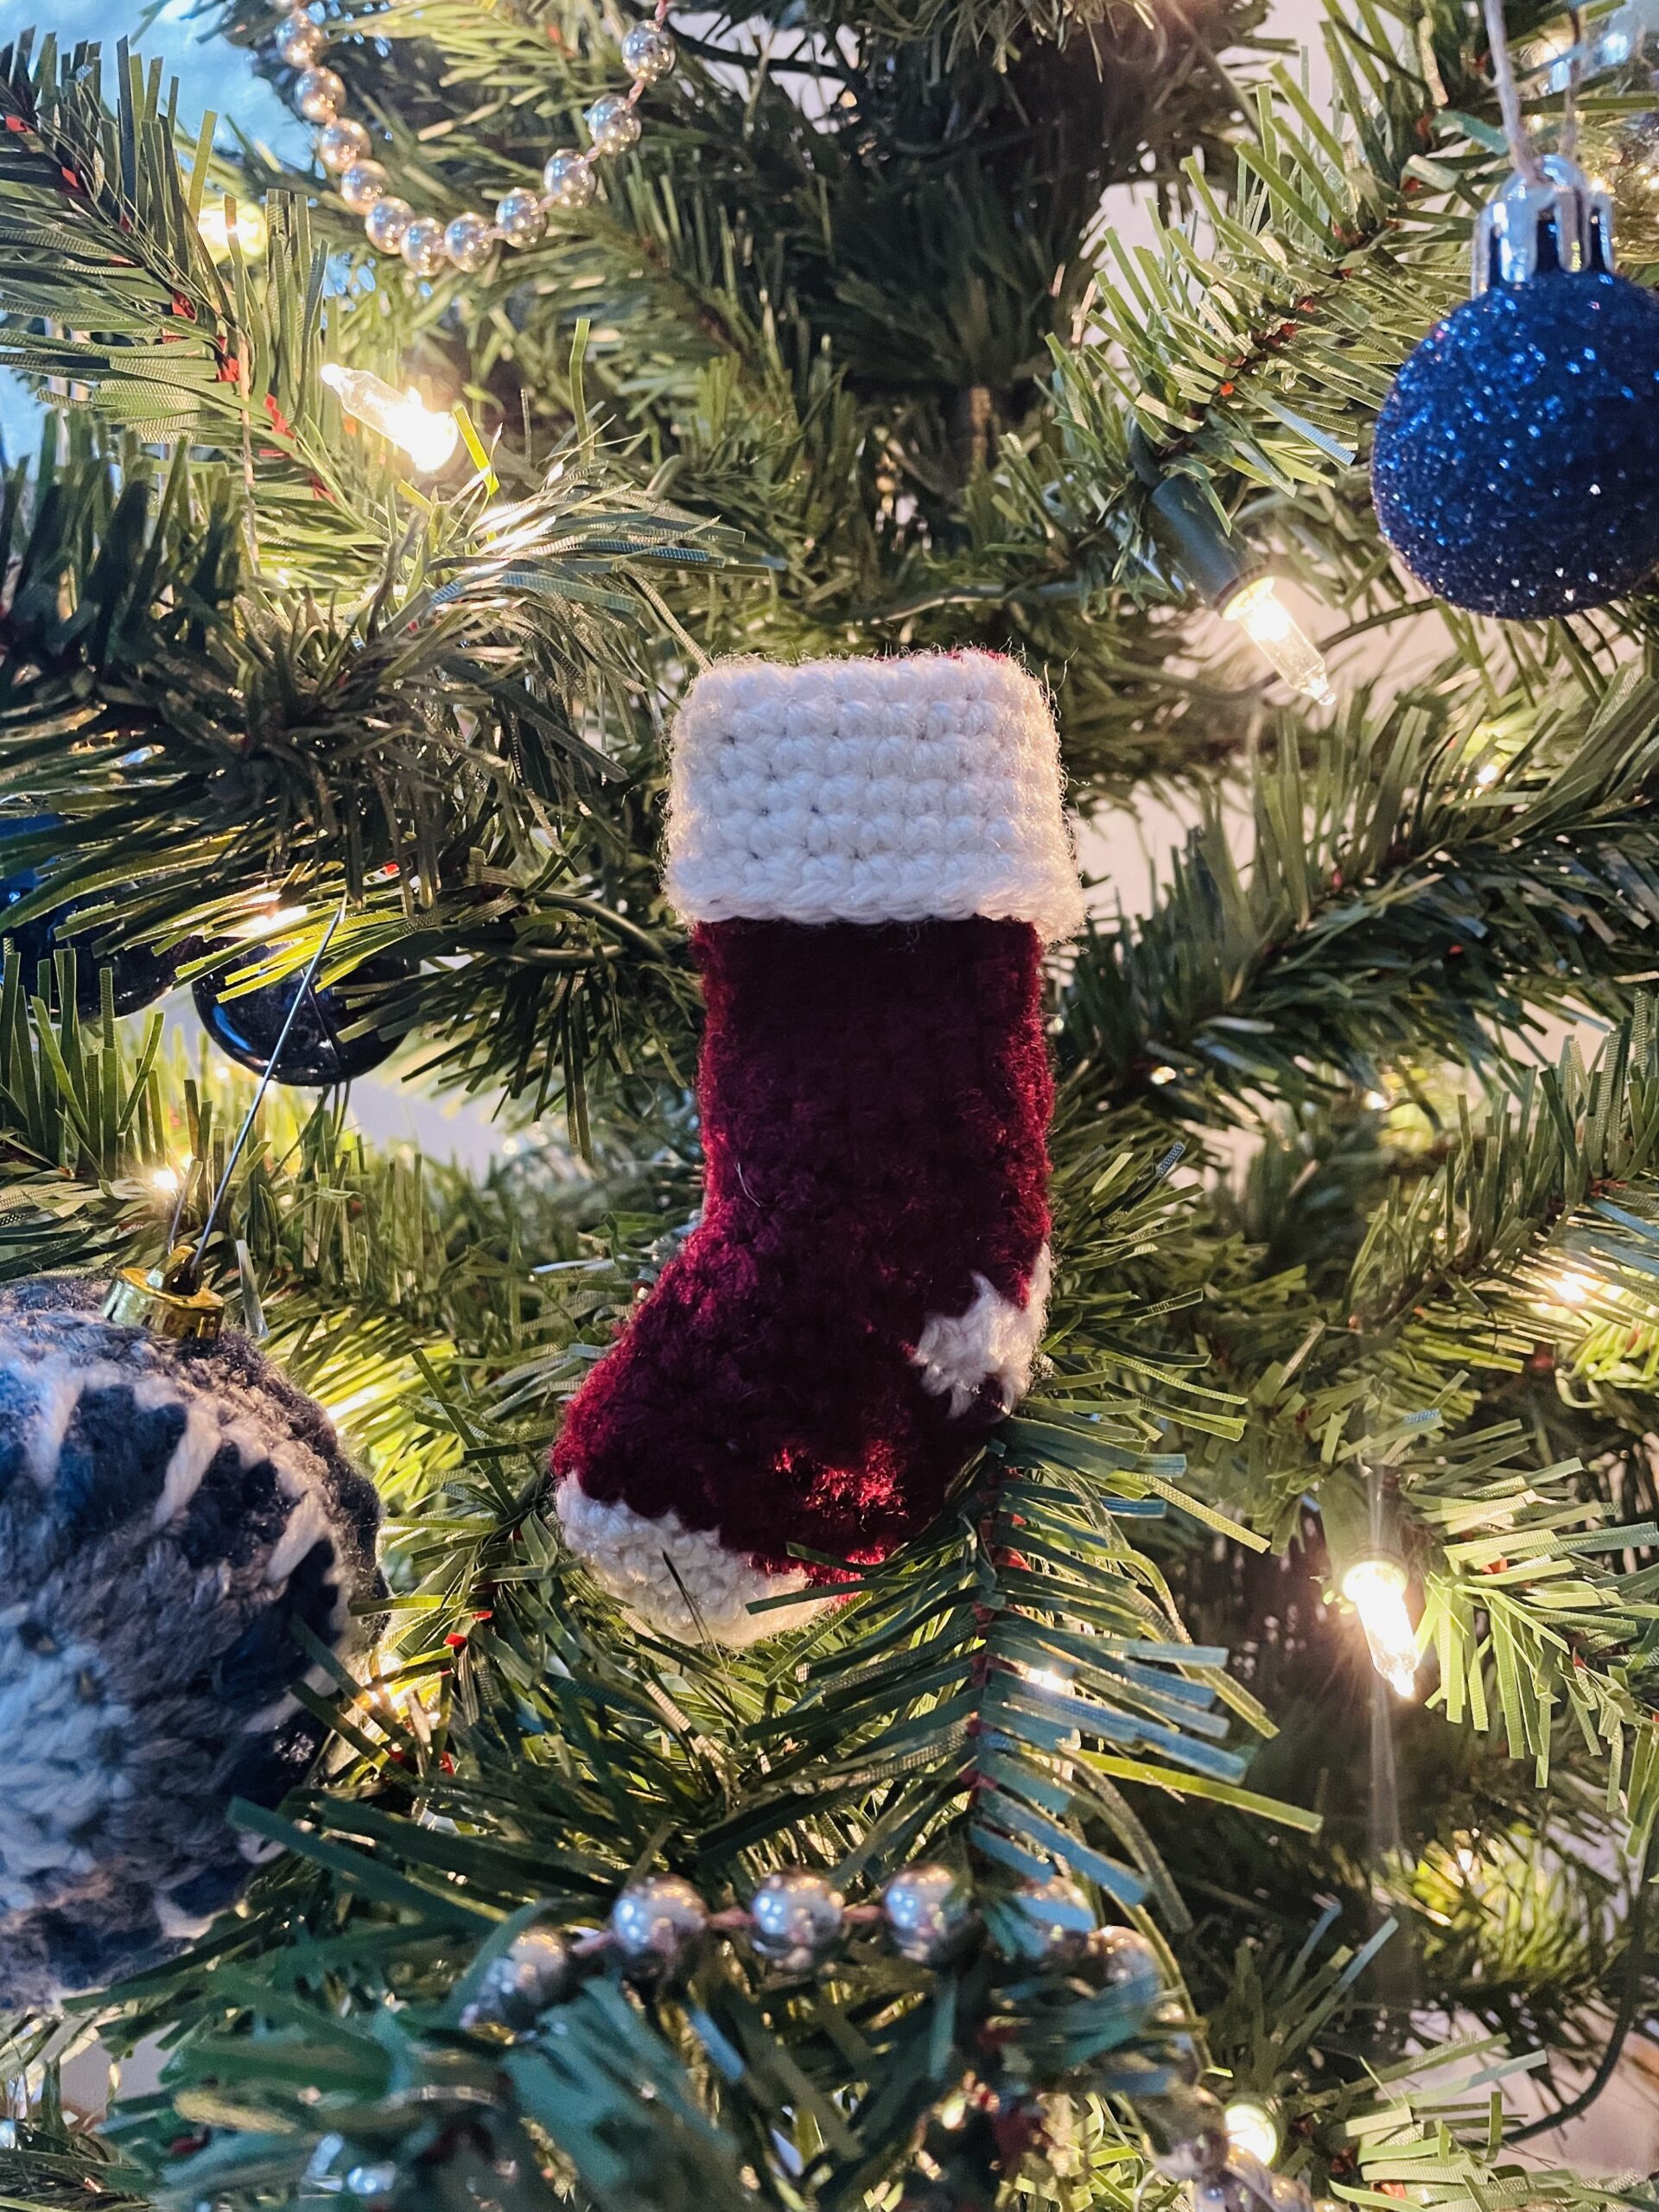
Materials:
- Scarps of yarn
- small crochet needle (3.0)
- tapestry needle
- scissors
- tutorial from Whistle and Ivy moderncrochet
This is a more challenging crochet project, but it was fun to make (in all kinds of colors and with all kinds of stripes if you want).
You’ll start with the toe part and that is the “magic ring”, which can be a little challenging for beginners. But after that it can go quick!
Here is a step by step video. I hope it’ll work. I think mine turned out pretty well!
I’m definitely going to make more!
Have fun and see you next time for our last craft of this year!
Day 12 Napkin Candles
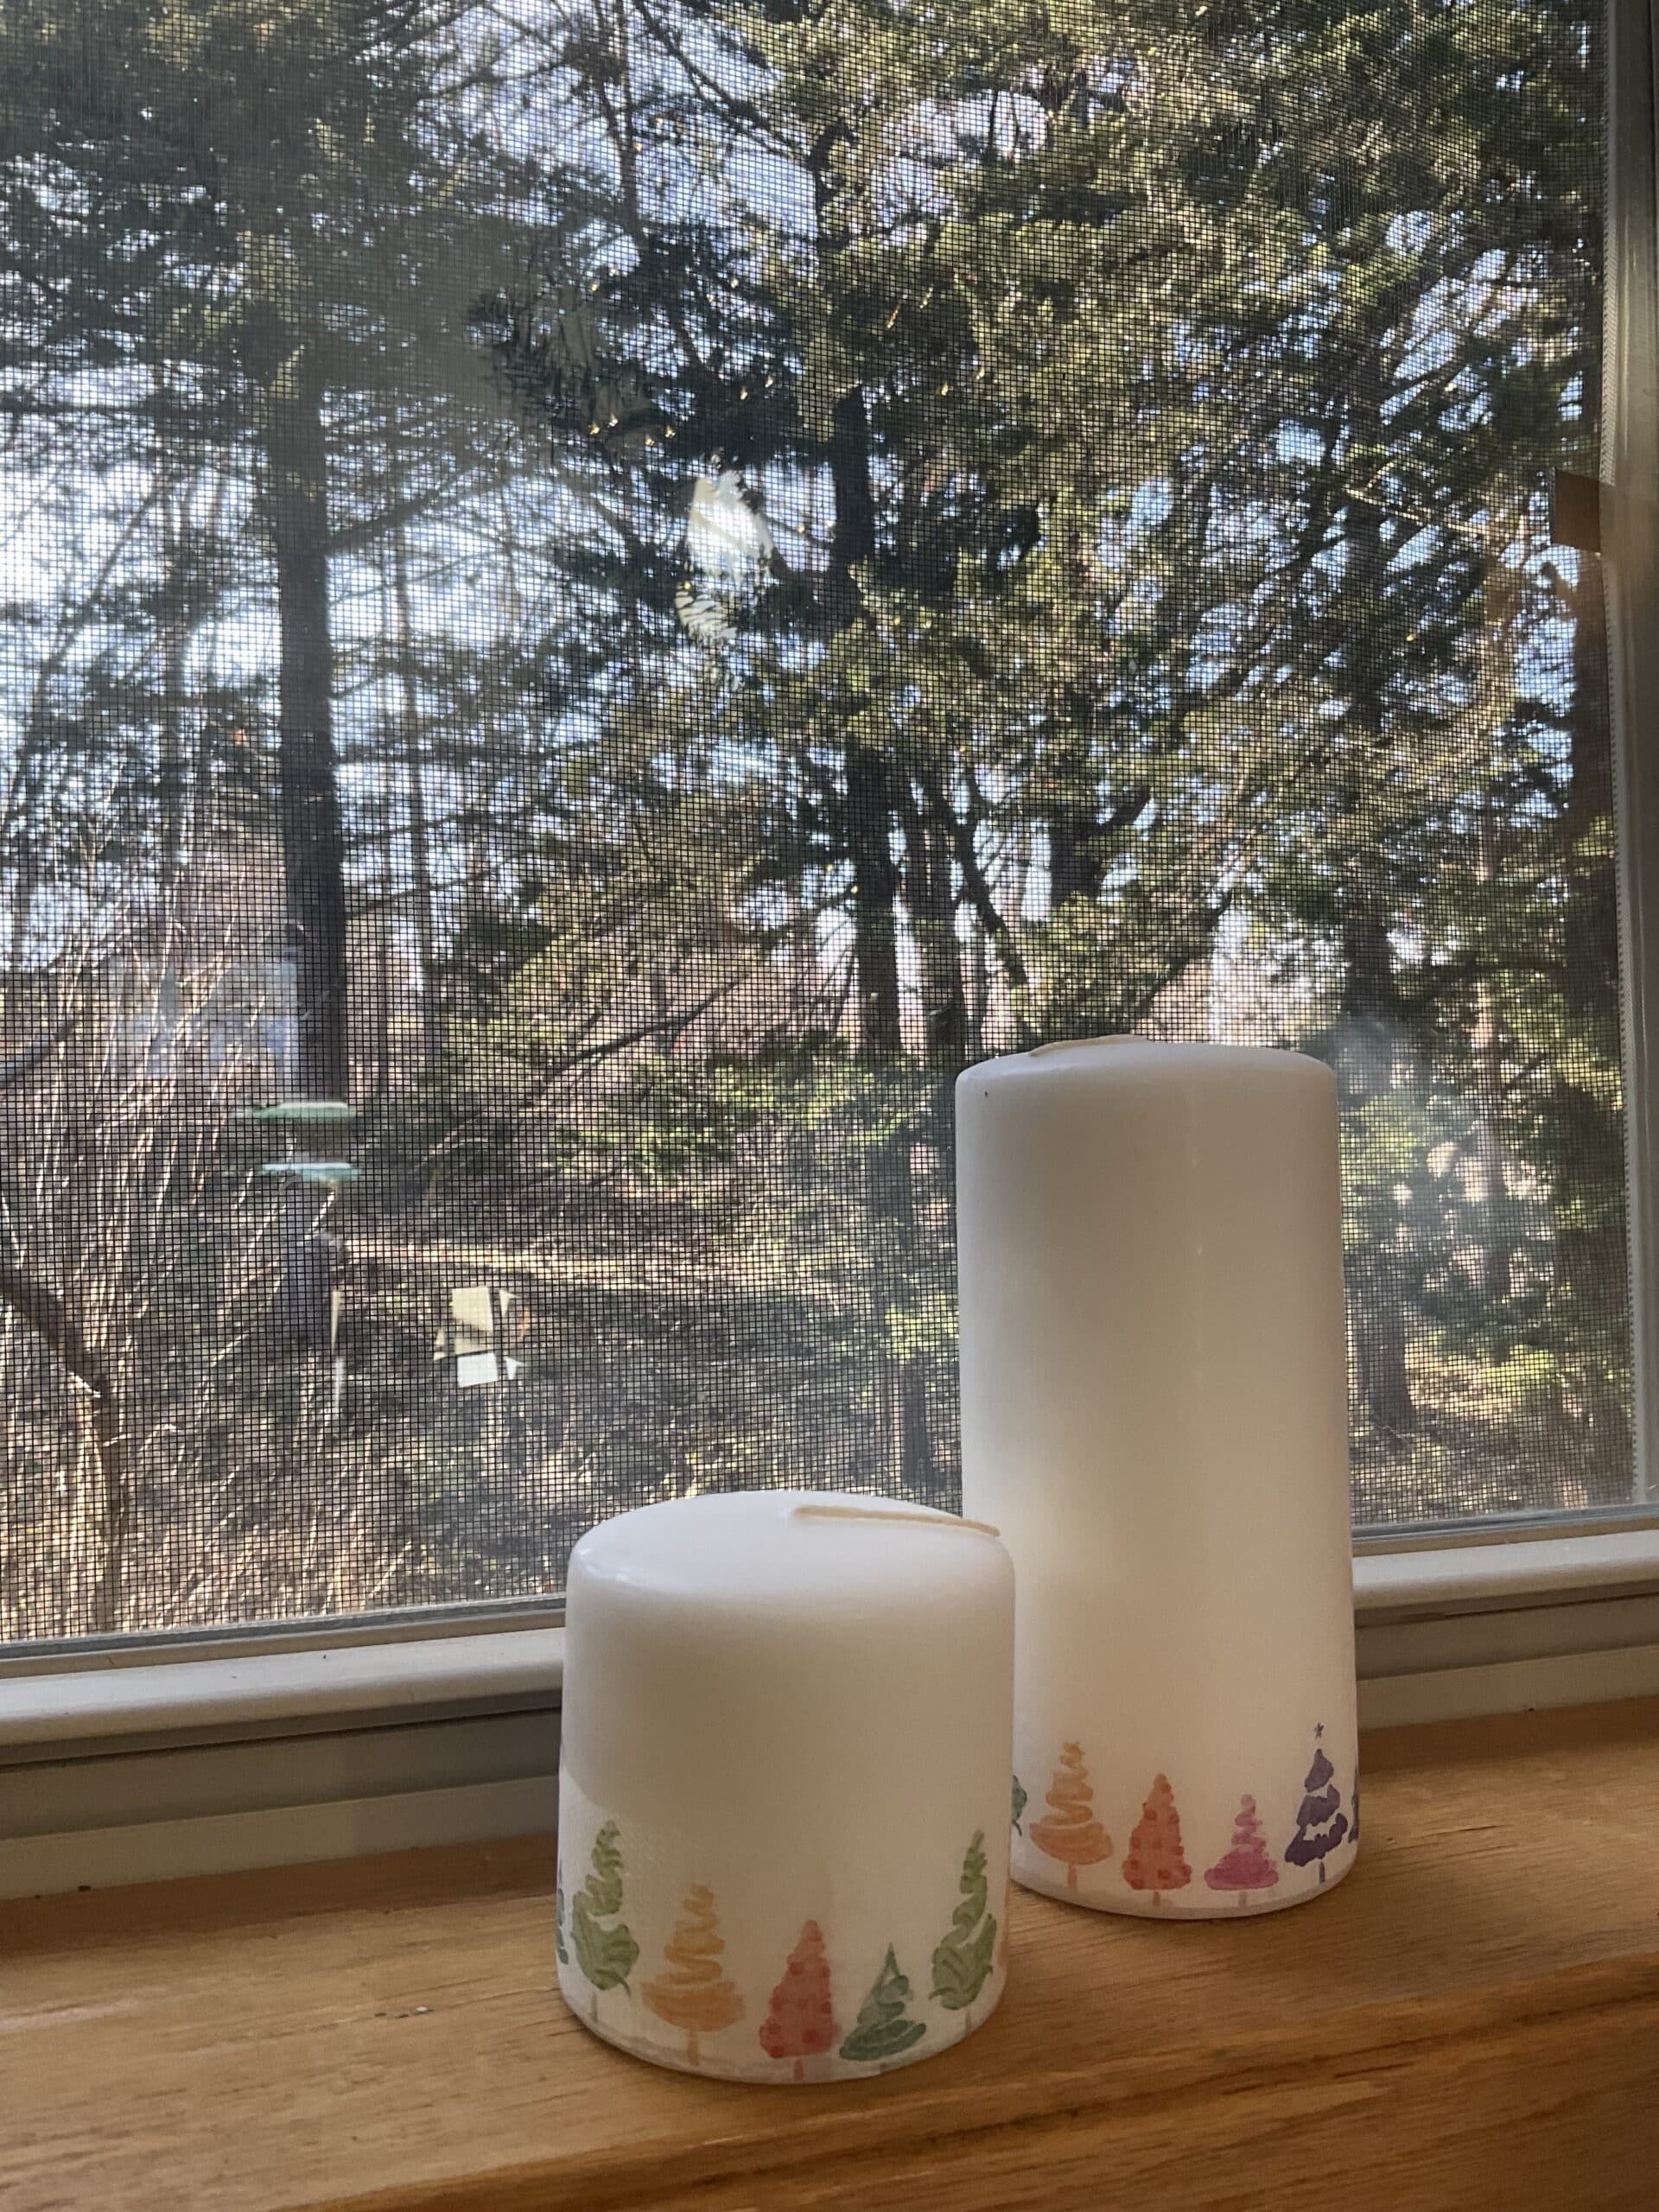
Materials:
- candles
- tea light
- metal spoon
- gloves
- napkins
- scissors
For the method on how to do it, I wrote another blog post on this. If you have the cutest Holiday themed napkins, this is so much fun to do!
Happy Holidays!!! 🌲 ⭐️ 🤶

Hello everyone,
Welcome to my Crafty Dutch Girl blog! Grab a cup of “koffie” and browse through fun blog posts about our Dutch family expat life in the USA, Dutch history, Dutch recipes, Dutch things to do in the USA and all kinds of crafts and activities. Don’t forget to connect with me for new ideas! “Groetjes en tot ziens”.