
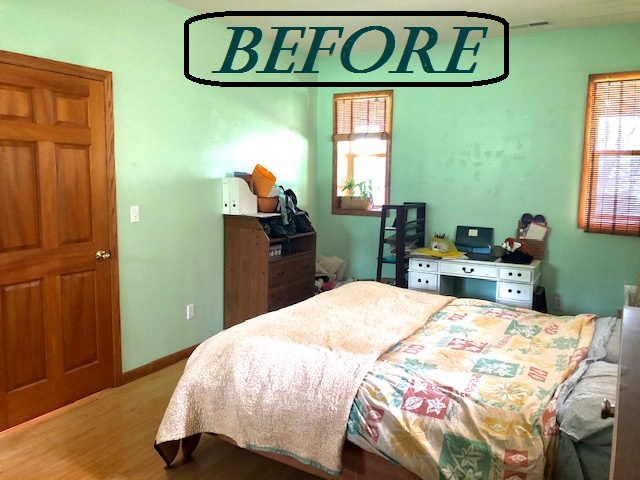
Project #2 of our DIY Home projects in our new house! Our master bedroom. The house we bought in February of this year (2020), was build in the ’90’s. A lot of wood and creamy white walls (or mint for our bedroom walls for that matter!). A blank canvas for me to start our dream master bedroom.
Crafty Dutch Girl is reader-supported. When you buy through links on our site, we may earn an affiliate commission. Learn more.
Fortunately for us, during the COVID-19 pandemic, we got to spend time at home and work on these projects. Our first project was one of our bathrooms. It became our first priority, because of a leaking sink and broken toilet.
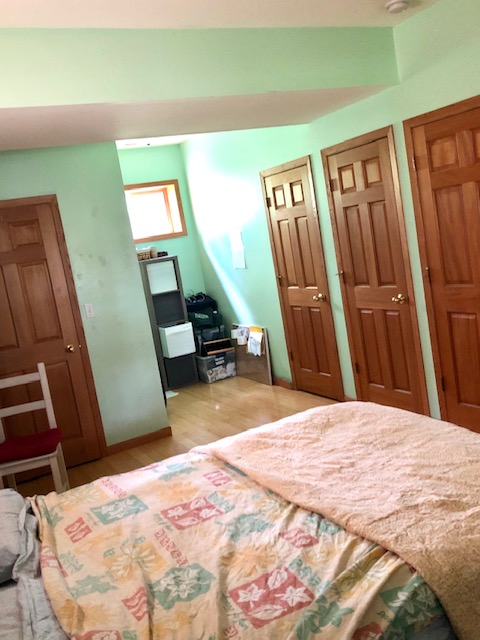
Before we started.
As we did our bathroom, we managed to do a lot of things ourselves. We watched YouTube video’s on how to install a new toilet or sink. It tested our relationship for sure, but it strengthened it too! The difference with the master bedroom is, that I didn’t need much help from YouTube video’s or my husband.
It was actually fun, looking at his face after working a few hours a day in the bedroom. Small and simple things made the bedroom a totally different place already.

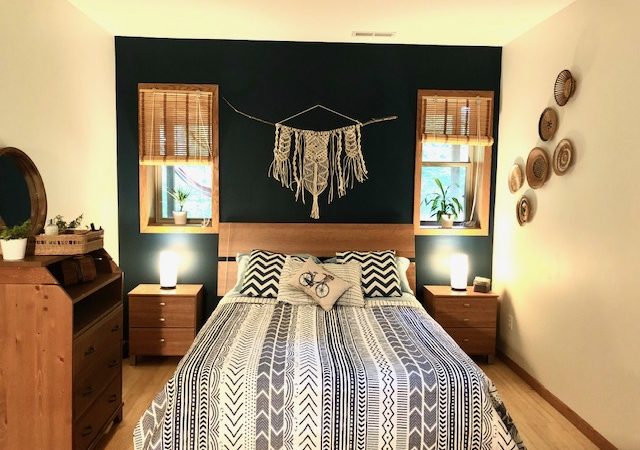
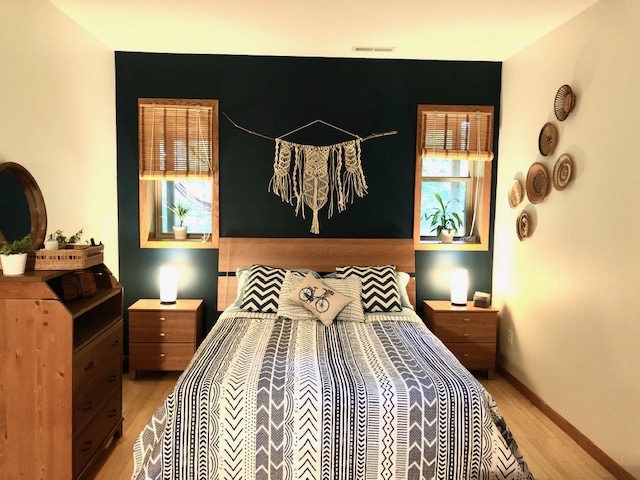
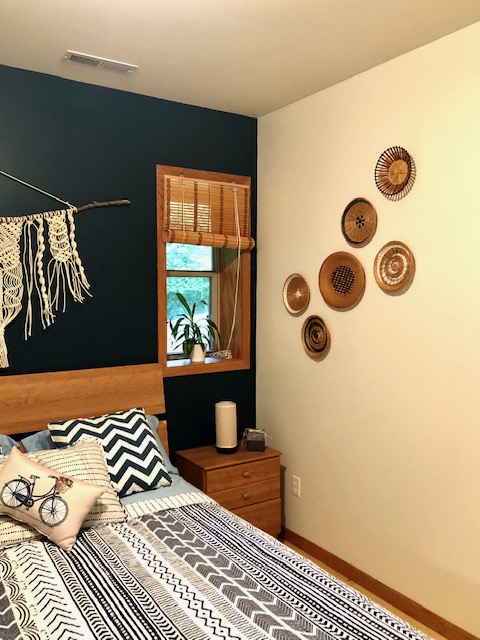
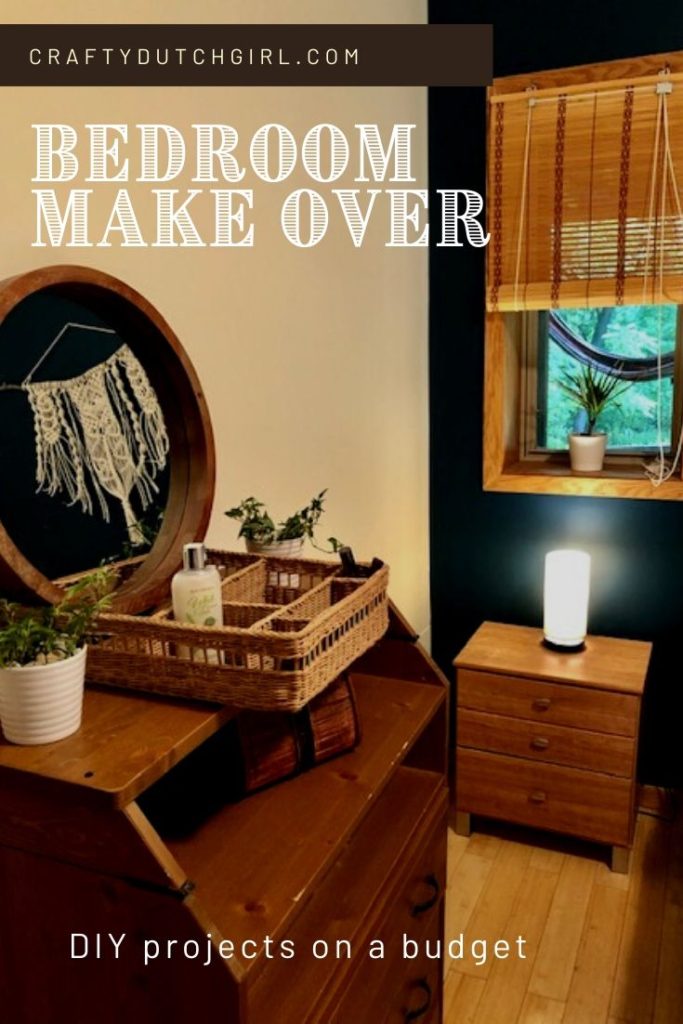
Our house is build on a slope and the bedroom is on the lower level of the house. This means that the south side is more than half under ground. There are 2 small windows and 2 medium windows, which won’t let much light in. All the walls were painted in a mint color. It didn’t look nice with the wood of the doors and windows at all. My idea was to paint the doors and windows creamy white and some of the walls, a darker teal blue and the other walls the same creamy white. I was also planning to white wash my furniture.
The room is long and I was thinking of painting the short walls dark teal and the longer walls a creamy white. Maybe then, it would look a lot cozier.
Step 1: Reorganizing furniture
It helped for me to make a list on Basecamp. This way my husband and I know what needs to be done, we can send notes to each other, add pictures and documents. I made some sketches to show my husband what my idea was. He had great suggestions too and we added those onto the Basecamp list.
Over the years we collected a few mismatched furniture pieces. My first plan was to white wash the bed frame and night stands, because I was painting the windows and doors white too.
But my first step was to move some furniture around. It needed more balance and symmetry.
That was already a big improvement. I could have done THAT in the beginning when we first moved in!
Total costs for this project: $0
Step 2: The Walls
I kept the furniture pieces off the wall, so I could easily clean the walls with “Krudkutter”. Then, I used painters tape to tape the short walls off. The short walls were painted “Mariana Blue” from Dutch Boy and the long walls and ceiling are going to be “Antiquated Lace”, also from Dutch Boy.
As soon as I painted the “Mariana Blue”, the wooden trims and doors just became a lot warmer. It was so pretty. It just popped! I was afraid the room would be a lot darker, but it didn’t. Now I was thinking not to touch the wood in the room at all (That could save me a lot of time and money!!!)
After the blue walls, I painted the long walls in “Antiquated Lace”. It looked a lot calmer. Somehow I felt the mint was “screaming” at me, LOL! Now that was gone.
Note: One of the long walls I’d like to ship-lap in the future. I have to figure out how. I think that would be such a great project and make the room even cozier!
Total cost for this project: $120 (paint, tape rollers and brushes, Krudkutter cleaner)
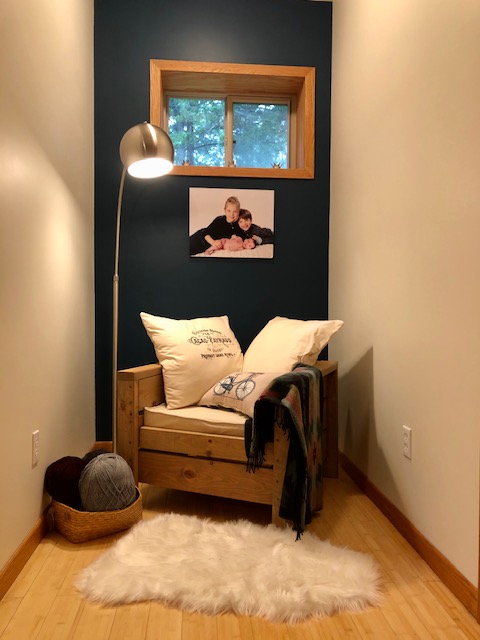
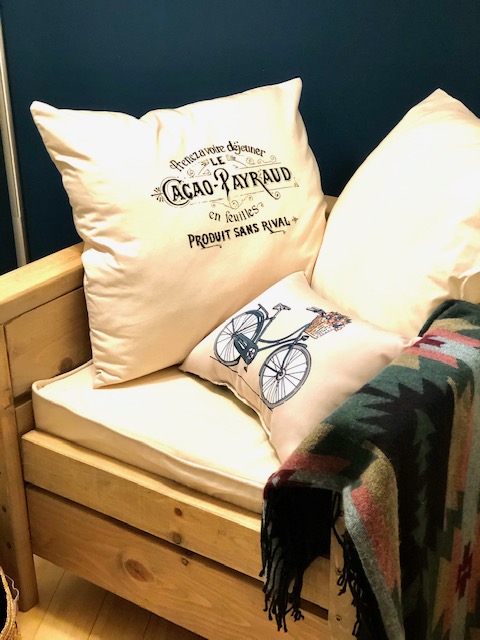
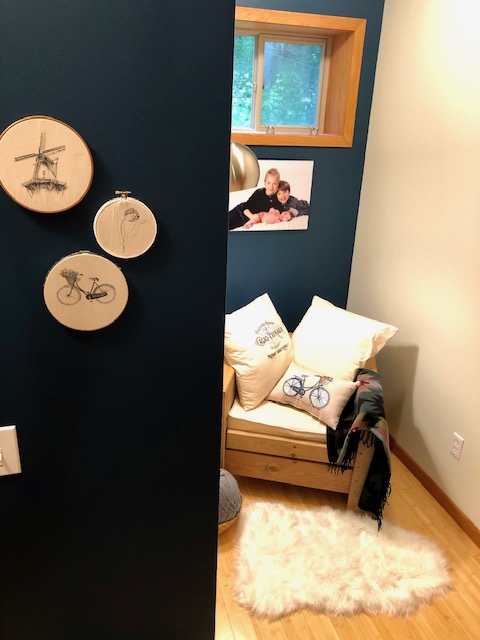
Step 3: The reading nook
On one side of our bedroom is an awkward little nook. The printer was there and we just threw some boxes there, which still needed unpacking from the move. Mostly office materials.
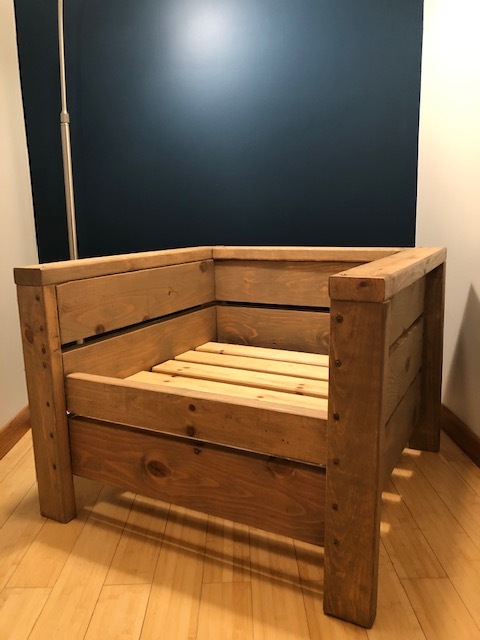
An idea came into mind: what if I make this into a reading nook? Two options came after that: I could make a wooden bench with drawers underneath, a foam mattress and lots of pillows OR I could make a wooden chair with a free standing lamp and cute pillows.
I wondered which one would be used more! The drawers and the bench frame seemed so difficult to make….ugh, tough decision! Okay, I’m going to make a wooden chair. I got the building plans here.
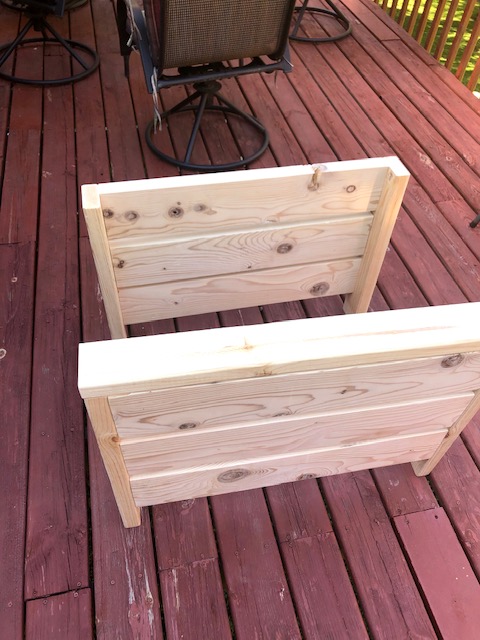
Building the chair
This was one project I needed my husbands help. We made the chair in one evening, outside on our deck! With wine….
Note: we don’t have a miter saw, so we used the saw at the Menards wood shop.
Go to Ana White’s website for making this chair. We used construction wood, which was about $30. If this is going to be an outdoor chair, I would choose a cedar wood, which is more durable, it’s highly resistant to insect attack and rot. But I was just planning to stain it, that was all.
For my Herb Box on the deck, I went to our local lumber. They cut the wood and recommended screws to do this project. The wood sizes were not right and the screws split the wood, so we went to Menards (during the pandemic, they didn’t let kids in and masks were mandatory). I felt safe..PLUS… the people there know what they’re talking about. We got information about the kind of wood and we got the right screws
That was about $30. Not too bad, but then we came to the other more expensive parts:
- 25 x 25 x 5 inch foam pillow and two 24 x 24 back pillows (almost $60 for all 3, see link below)
- creamy white thick fabric from Walmart (6 feet for $12)
The cushion and pillows
The chair is not done yet. I was looking on Pinterest and loved the idea of having vintage French quote on one of the pillows. I didn’t want to put it on the seating area, because it might rub off. So, I decided to make a cover for the foam cushion with piping. You can find a tutorial here.
It was time to make covers for the two back pillows. I hope I won’t have to wash the pillows too often, but if I need to, I made zippers in the pillows. Just in case!
Now the fun part! At least, I think it’s fun. It’s my kind of meditation. I just can zone out in these kind of situations.
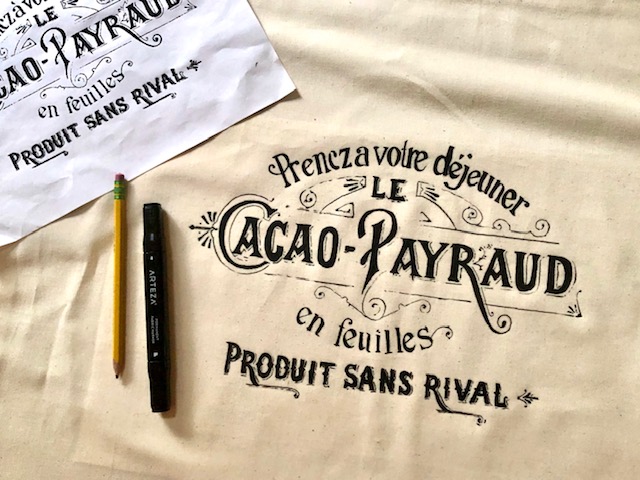
You might have read my blog post about printing on fabric with an ink jet printer. Well, that is not possible with a big pillow case like this one. So, how to make a print like this? After doing some research I came up with this:
How to make a print on a pillow case?
- Online I found I print I liked. I printed it out bigger than the standard printer paper. You get maybe 4 pages. I taped them together, so the print matched up.
- Go to my blog where I made a fun Herb Box for my deck. There I explain how I transferred an image (or letters) to wood. I used the same techniques with this pillow case.
- I “colored” the back of the paper with the print with black/dark grey pencil. Turn the paper and tape the paper to the pillow case. Put a piece of cardboard or card stock in the pillow case.
- Now comes the zoning out part:) Trace the image by going over the image with a pencil.
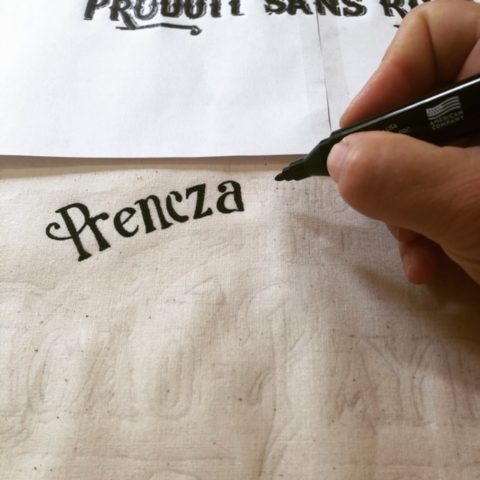
5. Take off the paper, but leave it close by for reference. I used permanent fabric markers to trace over the pencil lines and colored them in!
6. I used a cotton piece of fabric and ironed several times over the print, when I was done!
- Wood plus screws: $35
- Pillows for chair and cushion: $60
- Fabric for cushion and pillows: $12
- Fabric markers: $7
- Lamp: $114
- Faux sheepskin rug: $21
Total Cost for this project: $250
Other DIY decorations
1. Baskets on the wall.
You’ll see these decorations everywhere, and I though they’ll add a lot of fun and warmth to our “Antique Lace” white wall. I saw them last winter at Goodwill for $0.88 and $1 a piece. I added a little bit of wall paint and put them on the wall. Maybe I’ll add some more if I find some fun ones!
Total costs for this project: $3
2. Embroidery hoops as wall deco
In this blog post you can find, how I made these embroidery hoops with Dutch prints. Of course I had to incorporate some Dutch things into our bedroom…
Total Cost for this project: $0
I had everything in my home for this project, but if you’re looking for materials, below you’ll find links.
3. Macrame Wall hanging
This was my first big macrame project. I learned how to macrame at my elementary school in the Netherlands when I was about 10 years old. I forgot what the project was, but it was fun to learn a few knots.
Now I see that these beautiful macrame wall hangings have a great come back. I had to try it again. The idea is for our house to bring the outdoors indoor, so I used a stick, which I found in our forest-y garden. The stick is a little crooked, so that means that my project will be a little crooked too…and it is, LOL!
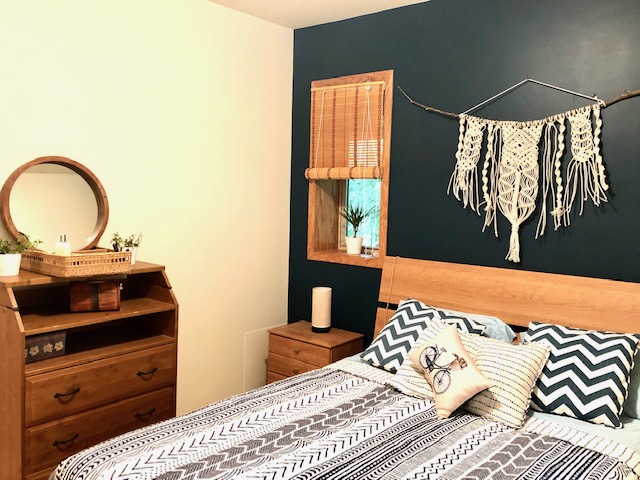
I used off white wash cloth line rope and tried several knots. I watched some YouTube video’s and came with a fun pattern. Some of the pictures look so pretty on Pinterest, but so complicated. Maybe in a few years I’m going to try a different version of macrame hanging for our bedroom!
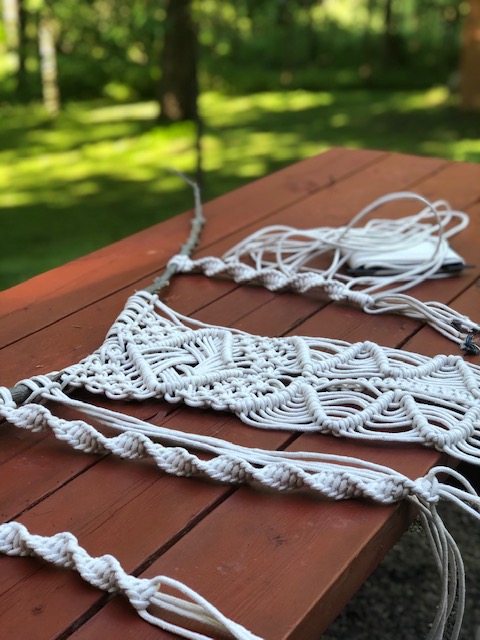
Total Cost for this projects: $20
4. Crochet Pouf
While I was sitting in my reading nook, I was missing something to put my feet up or something sturdy for a tray with my evening cup of tea.
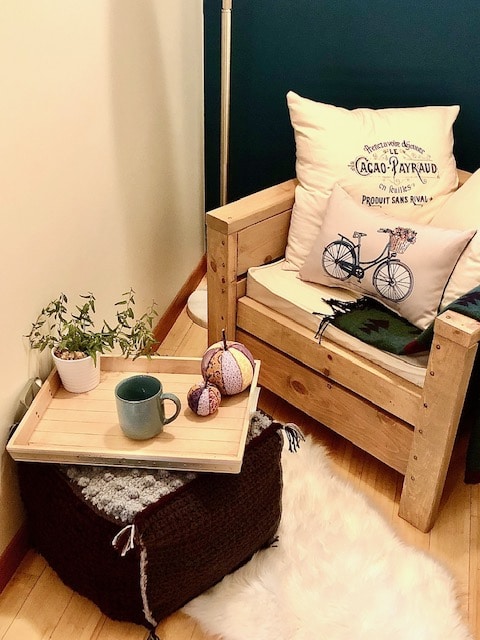
I bought 6 skeins of wool in 3 colors and used this link to get started.
It was so much fun to learn so many different crochet stitches. The idea is to make 6 sides (that means 6 different stitches). I choose to use 3 different colors and wanted to show the seam crochet stitch on the outside.

If you click above, you can see how one color looks like and the stitch on the inside, without the tassels. I thought it was a fun touch.
Total Cost for this project: $75
We are still working on little things, like painting the ceiling (which is actually still a big job to do), I’m sanding a bookshelf for the reading nook and my office area in our bedroom.
But in all, the total cost was about $468 for this make over! And I LOVE how it looks and feels!!!

Hello everyone,
Welcome to my Crafty Dutch Girl blog! Grab a cup of “koffie” and browse through fun blog posts about our Dutch family expat life in the USA, Dutch history, Dutch recipes, Dutch things to do in the USA and all kinds of crafts and activities. Don’t forget to connect with me for new ideas! “Groetjes en tot ziens”.
[…] made a pillow case with a print on canvas, so it would’ve been something like […]